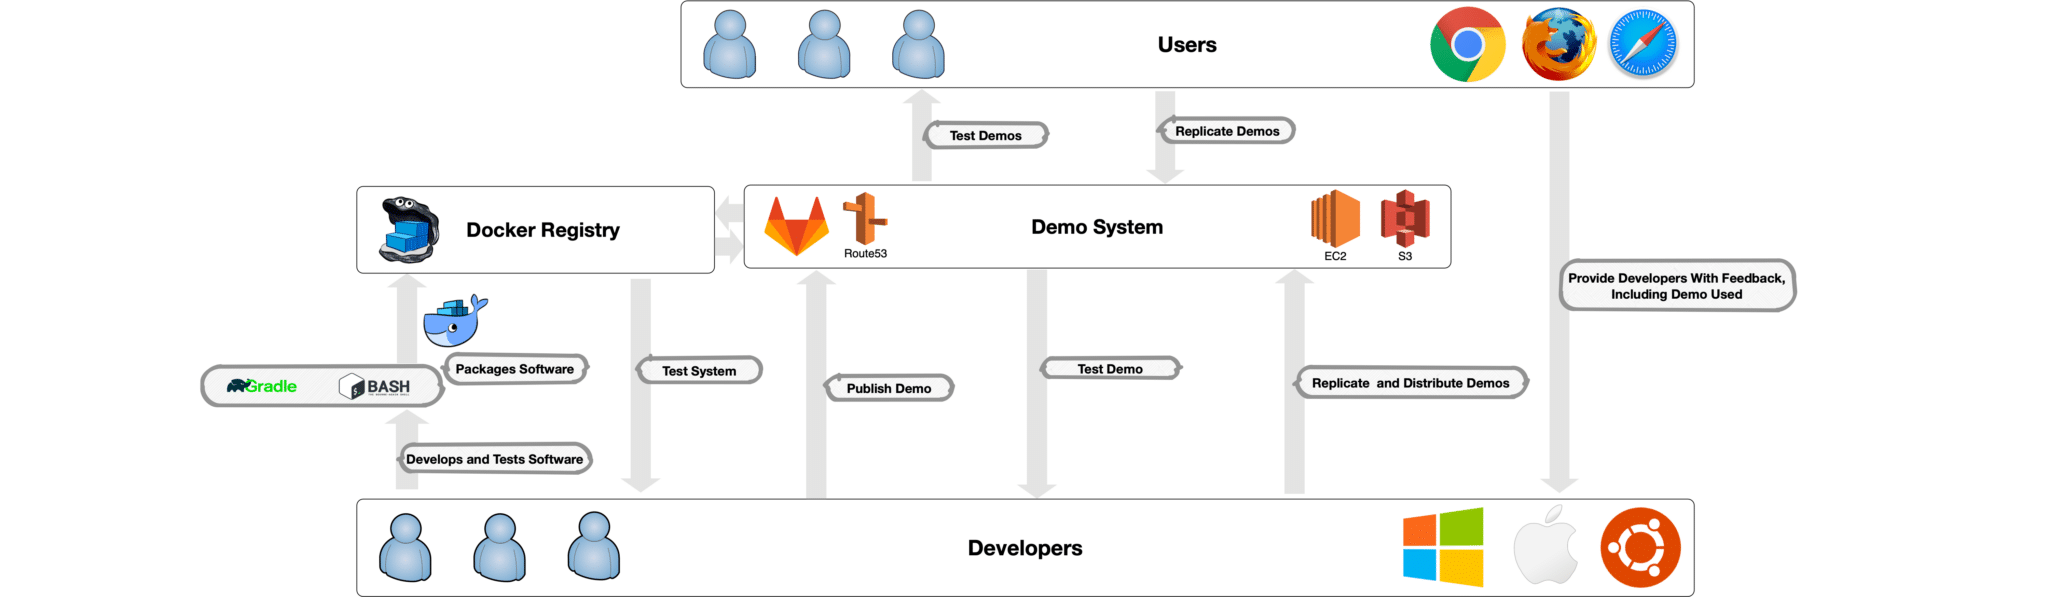
Modern project design requires rapid integration and software deployment from multiple companies. On our project, three companies extract information from natural language data; three companies utilize that information to perform model construction and forecasting; one provides a human-machine interface (HMI) to display both the extracted and analyzed information; and finally the components are melded into a consistent, scalable, end-to-end system.
Our goal is providing developers, users, and customers with individually customized, integrated demonstration systems that allow maximum vetting of research prototypes while substantially curbing the cloud utilization costs required for hosting.
We had a rough idea of the cost of having many demonstration systems running 24/7 (and it would be high!), so we knew we had to find a way to provide systems that are “always available” but not necessarily “always running”. Our insight was to optimize the orchestration of system startup and suspension, while making this process transparent to the user. We needed availability without expending resources on provisioned, idle compute instances.
Therefore, we designed a solution that rethinks how research systems can maximize vetting while minimizing the cost of doing so. Key pillars of this approach include:
- Simple for developers to author new demonstration configurations
- Extremely fast startup and suspend latency, reasonable for a user to wait
- Persistent states so no work is ever lost
- Scalable enough that all interested parties have their isolated testing systems executing at the same type.
- Reliable enough to “just work” after system creation without administrator intervention
- Financially feasible
We created the following self-service demonstration provisioner to meet these needs.
System Capabilities
The demo provisioning system has the following capabilities, each of which are covered in detail below:
- Full lifecycle management of demonstration systems: create, delete, suspend, clone
- Ability to execute on a local system
- Ability to run for long (> 6) hours
- System initialized and available in under 2 minutes
System Components
Backend
The provisioner backend is where all control path operations are handled. This system is run on a reserved AWS instance (the choice of AWS is explained in the closing sections of this post). This is the “always on” system that allows demos to be “always available”. The provisioner is accessible via both a GUI and an API.
Backend GUI

The purpose of the Backend GUI is to allow advanced users and developers to provide novice users with a central dashboard they can use to manage their demos.
Backend API
The Backend API provides endpoints allowing the Backend GUI and all other developer tooling to work. Demo creation and management is performed via this API.
Persistence Service
Each provisioned demo runs a persistence service responsible for:
- Periodically persisting demo data independently of the Backend
- Persisting demo data when instructed to do so by the Backend
- Cloning live demo data when instructed to do so by the Backend
Mirror Service
The mirror service is responsible for cloning the data of SUSPENDED demos and providing project-wide availability for Docker images built by our continuous integration (CI) process.
Local Deploy
The creation of demo configurations is facilitated by a Docker image (local-deploy) built to scrape a machine’s Docker daemon. local-deploy collects the Docker tags, labels, and environmental variables of all running containers with the label “demo”.
Gradle Plugin
To simplify the demo creation we published a gradle plugin to tag and label images.
Build Scripts
We replicated the Docker-related functionality of the Gradle Plugin in build scripts (written in shell) to expedite the build process for projects that are not on the JVM.
Git and CI/CD
All repositories in our system are configured to utilize Webhooks to trigger the mirror and record creation processes post-build. We apply the processes similar to those described in this article on how our radiation detection platform works, scaled up with the tricks here.
Mass Replication Script
One need that arose while creating/destroying demos was the ability to bulk clone demos.
We wrote the following script, which uses the Backend API, to clone a specified source demo to multiple destination demos:
#!/usr/bin/env python3
import click
import requests
@click.command()
@click.argument('sourcedemo')
@click.argument('oauthtoken')
def cli(sourcedemo, oauthtoken):
    dest_demos = ['user', 'someotheruser']
   # dest_demos = ['some', 'other', 'group', 'ofdemo', 'names']
   cookies = dict(_oauth2_proxy=oauthtoken)
   src_demo_id_req = requests.get('https://dev.example.com/web/api/id-for-domain/'+sourcedemo, cookies=cookies)
   src_demo_id = src_demo_id_req.json()['id']
   for demo in dest_demos:
       dest_demo_id_req = requests.get('https://dev.example.com/web/api/id-for-domain/'+demo, cookies=cookies)
       dest_demo_id = dest_demo_id_req.json()['id']
       delete_req = requests.post('https://dev.example.com/web/demos/delete', cookies=cookies, data = {'id': dest_demo_id})
       clone_req = requests.post('https://dev.example.com/web/demos/clone', cookies=cookies, data= {'config_name': demo, 'config_description': 'Clone of '+sourcedemo+'.', 'source_id': src_demo_id})
if name == 'main':
   cli()
This functionality allows us to rapidly disseminate identical copies of running systems, removing the need for manual replication of problematic situations (e.g., bug hunting) and allowing users to base their work on other users’ demos.
Creating Demos
Requirements
- Extractor and causal analysis component images, which will be used in a demo system, must be tagged (registry/branch/repo-name:commit) and labelled (PROJECT_NAME=X, COMMIT=y, DOCKER_TAG=registry/branch/repo-name:commit) per our project’s conventions.
- Images must be mirrored to a repository with general access. During the mirroring process, records on the images are created.
- Images’ Dockerfiles must not use the VOLUME command.
- Software in images must persist state information to disk.
- Software in images must support being restarted.
- Images’ HEALTHCHECKs must be configured and correct, or containers must exit when unhealthy.
Rules
- Non-Admin Users may only suspend and delete demos they created with fewer than 350 minutes of runtime remaining.
- Non-Admin Users may only deploy demos for durations of less than 350 minutes.
- Non-Admin Users may only launch demos (launch defined as the transition from PENDING to LIVE) that they have the permission to edit.
Demo Creation
A Docker Compose file was written to deploy a demo system configuration locally. Images that are to be included in the demo are labelled with the label demo=true.
Once a system configuration is running locally, users run the Docker container local-deploy and visit localhost:5000. On this page, they are presented with output of the information to be published if a demo is created. This consists of all environmental variables and the “resolved” Docker tags of the containers running on the system. (“Resolved” Docker tags are immutable. For our project, these tags are of the form, mirror-registry/original-group-of-image/project-name:commit.)
After reviewing the information, the user gives the demo a name (consisting of 4 to 20 lowercase alphanumeric characters) and a description. A demo is then created in the PENDING state.
During creation, a DNS record for the domain <demoName>.cloud.example.com is created via AWS’s Route53. Route53 is used as it drastically simplifies dealing with DNS records, allowing us to focus on using the records rather than managing and configuring the nameservers serving them. We keep all demos under the domain .cloud.example.com to keep things simple.
Demo Lifecycle


Demos have four states, PENDING, LIVE, SUSPENDING, and SUSPENDED.
Initiation and Resumption

Demos in either the PENDING or the SUSPENDED states can be started via either:
- Visiting a landing page with all demos (useful for admins)
- Visiting the domain demoName.cloud.example.com
When demoName.cloud.example.com is visited, if the demo is not running, a Vue.js app (shown above) is executed to allow the user to define a duration. After a selection has been made, the app then polls demoName.cloud.example.com/api/health, informing the user of provisioning progress, as the request transitions from 502 (demo instance offline) to 503 (demo running, services becoming healthy), to 200 (demo services healthy). Once the app gets a 200, it triggers a hard refresh of the page, presenting user with the demo GUI.
The entire process takes 5 minutes or less. During this time, the Backend uses the demo’s last active state and information on its images and their configurations to build a shell script to launch it. This shell script is then passed to AWS as user-data.sh. It is, more or less, the following:
#!/bin/bash
mkfs.btrfs -f /dev/nvme0n1
mount -o ssd -o autodefrag -o noatime /dev/nvme0n1 /var/lib/docker
cat << "EOF" > /etc/docker/daemon.json
{
  "max-concurrent-downloads": 50,
    "max-concurrent-uploads": 50,
      "storage-driver": "btrfs",
        "registry-mirrors": ["https://mirror.gcr.io"],
          "log-driver": "json-file",
            "log-opts": {"max-size": "10m", "max-file": "3"}
            }
            EOF
            systemctl start docker
            docker network create demo-network
            PIDS=()
            docker login -u username -p password docker.example.com
            docker run -d --restart always -v /var/run/docker.sock:/var/run/docker.sock --label hide=true --network demo-network --name autoheal -e AUTOHEAL_CONTAINER_LABEL=all willfarrell/autoheal:latest &
            PIDS+=($!)
            docker run -d --restart always --label hide=true --network demo-network --name nginx-hmi docker.example.com/twosixlabs/docker/demo-nginx/hmi/demo-nginx:latest &
            PIDS+=($!)
            docker pull docker.example.com/demo/snapshots/apis/kosearch:demoname &
            PIDS+=($!)
            docker run -d --restart always -e "JAVA_VERSION=8u181" -e "INDEX_CONSTRUCT=false" -e "VIRTUOSO_URL=jdbc:virtuoso://virtuoso:1111" -e "JAVA_HOME=/docker-java-home" -e "ELASTICSEARCH_HOST=elasticsearch" -e "PATH=/usr/local/sbin:/usr/local/bin:/usr/sbin:/usr/bin:/sbin:/bin" -e "JAVA_DEBIAN_VERSION=8u181-b13-2~deb9u1" -e "CA_CERTIFICATES_JAVA_VERSION=20170531+nmu1" -e "LANG=C.UTF-8" --label demo=true --network demo-network --name kosearch docker.example.com/demo/snapshots/apis/kosearch:demoname &
            PIDS+=($!)
            for pid in ${PIDS[*]}; do wait $pid; done;
Some highlights of the above script are the following:
- This snippet was generated by resuming a SUSPENDED demo. This can be seen in the command:
docker pull
docker.example.com/demo/snapshots/apis/kosearch:demoName &
This command pulls a docker image tagged with demoName from the snapshot registry. The source of that image (which does not contain state information) is docker.example.com/demo/integration/apis/kosearch:commit, which is in the integration registry.
- The beginning of this script formats the demo system’s attached SSD as a btrfs file system and configures Docker to use that volume for all images and containers (maximizing speed for all configurations tested, see below for more details on this).
- It backgrounds all docker pull and docker run commands, running docker pull before docker run, and waiting for all backgrounded jobs to complete before exiting. The reasoning behind this is if Docker queues requests, the docker pulls are executed before the docker runs.
- The autoheal container, which kills unhealthy containers, is used in combination with the –restart argument in all docker run commands. This handles startup dependency resolution, containers that started in the wrong order are restarted until their dependencies are available.
- Environment variables found via local-deploy are set when the published containers are run.
- If this demo was starting from the PENDING state rather than the SUSPENDED state, the kosearch image used would be from the mirror registry and it’s tag would end with the first 7 characters of the hash of the git commit from which it was built (which is stored in the Docker label COMMIT).
While that script is running the Vue.js app polls a path on its own domain to see if the demo is online. The following diagram describes how requests are routed to allow demoName.cloud.causeex.com to deliver the correct content throughout this process:

The following blocks of nginx configuration (which uses nginx’s fallback functionality to serve either the Vue.js app or a demo) enables this functionality:
- Always serve /api/health, never caching responses
location /api/health {
   #
   # Never cache requests to this endpoint.
   #
     add_header Last-Modified $date_gmt;
     add_header Cache-Control 'no-store, no-cache, must-revalidate, proxy-revalidate, max-age=0';
     add_header "Vary" "Origin" always;
     if_modified_since off;
     expires off;
     etag off;
     proxy_no_cache 1;
     proxy_cache_bypass 1;
   #
   # Always proxy user’s to the domain of the demo instance they are requesting.
   #
     proxy_set_header Host $subdomain-hmi.cloud.example.com;
     proxy_pass https://$subdomain-hmi.cloud.example.com$request_uri;
     add_header "Access-Control-Allow-Methods" "GET, POST, OPTIONS, HEAD" always;
     add_header "Access-Control-Allow-Headers" "Authorization, Origin, X-Requested-With, Content-Type, Accept" always;
     add_header "Access-Control-Allow-Origin" $http_origin always;
     add_header "Access-Control-Allow-Credentials" "true" always;
}
- Serve the demo when available, pointing error pages to the location @fallback, never caching responses
location / {
     #
     # Serve the Vue.Js app (which allows users to start instances) whenever a request demo fails.
     #
     error_page 400 401 402 403 404 405 406 407 408 409 410 411 412 413 414 415 416 417 418 420 422 423 424 426 428 429 431 444 449 450 451 500 501 502 503 504 505 506 507 508 509 510 511 = @fallback; proxy_read_timeout 900s;
     #
     # Disable caching to ensure requests are always served with data from the correct location.
     #
     add_header Last-Modified $date_gmt;
     add_header Cache-Control 'no-store, no-cache, must-revalidate, proxy-revalidate, max-age=0';
     if_modified_since off;
     expires off;
     etag off;
     proxy_no_cache 1;
     proxy_cache_bypass 1;
     proxy_intercept_errors on;
     #
     # Try and serve the demo (using the domain that points at it).
     #
     proxy_set_header Host $subdomain-hmi.cloud.example.com;
     proxy_pass https://$subdomain-hmi.cloud.example.com$request_uri;
}
- Serve the Vue.Js app at @fallback, having it served when demos are offline, never caching responses
location @fallback {
   #
   # Disable caching of the Vue.Js app.
   #
   add_header 'Cache-Control' 'no-store, no-cache, must-revalidate, proxy-revalidate, max-age=0';
   expires off;
   proxy_intercept_errors on;
   add_header "Vary" "Origin" always;
   #
   # Permit the Vue.Js app to post to backend.example.com.
   #
   proxy_pass http://rdr:80;
   add_header "Access-Control-Allow-Methods" "GET, POST, OPTIONS, HEAD" always;
   add_header "Access-Control-Allow-Headers" "Authorization, Origin, X-Requested-With, Content-Type, Accept" always;
   add_header "Access-Control-Allow-Origin" $http_origin always;
   add_header "Access-Control-Allow-Credentials" "true" always;
}
Users connect to demos via the nginx configuration above, a conditionally switching proxy as shown in the “Demo Initiation” Diagram, which avoids problems with browsers caching DNS records and ignoring TTLs.
This is necessary as demo IP addresses change each time they are provisioned, requiring the DNS records pointing to them (such as demoName-hmi.cloud.example.com) be updated.
The Backend, which is where this nginx resides, does not cache DNS records. It only uses the authoritative nameservers of these records. These assure that updates are seen by our Backend as soon as they occur.
Suspension
The Backend checks every minute to see if any demos need to transition from LIVE to SUSPENDING or SUSPENDING to SUSPENDED.
LIVE demos are transitioned to SUSPENDING when the duration of the demo ends or a user saves/suspends their demo via the Backend GUI. During the transition, all user-facing DNS records are updated to point to the proxy to the demo. This forces that proxy to return 502 (falling back to the Vue.js app) for all requests. During the next check of demo states, this SUSPENDING demo is forced to commit, tag, and push all running images to the snapshot registry (saving state information).
Once this process completes (which can take up to 5 minutes), the demo instance is terminated, the remaining DNS record is pointed to the proxy (rather than the demo) and the demo state is transitioned to SUSPENDED.
To mitigate the risk of data being lost when the Backend is down, images are also committed and pushed by the demo to the snapshot registry every 15 minutes.
Cloning
The process of cloning demos changes with demo state.
Demos in the PENDING state clone most quickly as all that needs to be done is creating the clone’s static DNS record and its records in the demo database.
Demos in the LIVE state clone slowest. When demos in the LIVE state are cloned, the Backend has the persistence service save the executing demo with the Docker tags of the new clone (so, demoName2 instead of demoName for this example). Once this process completes, the static DNS record for the clone and records in the demo database are created, creating a new SUSPENDED demo.
Demos in the SUSPENDED state clone a bit slower than PENDING demos do. When demos in the SUSPENDED state are cloned, a service on the Backend (which is a modified version of the mirror service) is executed, which pulls the Docker images containing the state of the demo being cloned, retags these for the clone, and pushes the new demo. The static DNS record for the new demo and records in the demo database are then generated, creating a new SUSPENDED demo.
Demos in the SUSPENDING state cannot be cloned, but this has not proven to be a problem because demos remain in this state for only about 3 to 6 minutes before they transition to SUSPENDED. If cloning of SUSPENDING demos were to be allowed, the service persisting the demo would be updated to lock a mutex. The persistence service would then wait for that mutex to be freed (which will occur before instance termination) before replying to the Backend with a response (informing the Backend that the images should be mirrored as if the instance was SUSPENDED).
Deletion
Deletion consists of terminating the demo (if its state is LIVE), retagging and pushing the scratch Docker image with each of the demo’s Docker image tags (if the demo’s state is not PENDING), and subsequently deleting the records for the demo.
Retagging and pushing the scratch Docker image allows the cron job responsible for pruning untagged images in the Docker registry to reclaim the space used by the demo.
Demo Management
Running Demos Locally, with State Information
Another need that arose was to run demos locally, with state information.
We addressed this by writing a function on the Backend to generate Docker Compose files for demos on-demand (and adding a button for that on the demo admin page menu).
Updating Demo Environment Variables
As the purpose of this system is allowing users to create identically configured systems running locally, on AWS, and/or on multiple systems across AWS, changing the environment variables of containers on systems is not wise (as this would complicate the requirement for resuming a demo).
That being said, things break at inopportune times, and sometimes environment variables need to be changed while state information is saved.
The following query template is used (when absolutely needed) to update a demo’s environment variables (which are stored as jsonb in postgres):
update imagesets set env_vars=jsonb_set(env_vars, '{SOME_ENV_VAR}', '"3"') from images wher e imagesets.image_id = images.id and imagesets.set_name='somedemo' and images.hostname='some-container';
Reserved Demos
While this system was initially created to use AWS spot-block instances (and non-admin users can only use these), the need to support reserved instances eventually arose.
We addressed this by implementing an additional provisioning function and modifying the UI rendered for admin users. The provisioning function is chosen based upon the duration of the requested demo. If a duration greater than 350 minutes is needed, the demo system uses AWS’s RunInstances action to obtain an On-Demand instance.
Note that a similar UI change was not needed for non-admin users as they can only access spot-block instances (there is little reason to add a button for a Forbidden/403 function for a user).
Suspend and delete functions were also updated to permit admin users to perform these actions on demos with greater than 350 minutes of runtime remaining (allowing users to suspend/resume reserved demos as their termination approached, if needed).
Keeping Storage Low Cost
The persistence strategy of this system relies heavily on Docker Registry cleanup. Each Docker container for a demo has a single Docker tag that is used to persist its state. Each time a container is committed to an image and that image is tagged and pushed, the tag is removed from the previously pushed image and assigned to the new one.
This allows images with old state information to be pruned via the deletion of images that are untagged (i.e., only tagged with a container hash) when the following command is run (which uses this tool):
root@07e182034b59 /root/go/bin/docker-distribution-pruner -config=/var/opt/gitlab/registry/config.yml -parallel-repository-walk -parallel-blob-walk -jobs=100 -parallel-walk-jobs=100 -delete -soft-delete=false
The tool is quite fast. It pruned a 12TB registry down to 1TB in about 30 minutes on a c5d.4xlarge instance.
Determining the Size of Demos
While Gitlab’s GUI makes it straightforward to determine the size of persisted demos, it would be tedious to sum the individual sizes. The following command prints the disk space of all Docker containers running:
root@demomachine docker ps -s | tail -n +2 | sed -E 's/.*(virtual (.*))/1/g' | numfmt --from si --suffix B | awk '{ sum+=$1 }END{ print sum }' | numfmt --from=si --to=si
29G
Making it User Friendly and Fast
Minimizing Startup Time
Demo resource usage during startup was examined we discovered a disk I/O bottleneck. The bottleneck is caused by the manner in which images are pulled and decompressed, coupled with how containers are created.
Addressing this involved switching to nvme instances, and updating the user-data.sh script generation function to relocate /var/lib/docker to the nvme disk (or, in the case of devicemapper, to just use the ssd’s block device).
The following table provides information on the performance of various Docker drivers and filesystems.
| Filesystem | Time (s) | Format Command |
| zfs | 50 |
zpool create docker /dev/nvme1n1 && zfs create -o compression=off -o atime=off -o mountpoint=/var/lib/docker docker/store |
| lvm | 81.2 |
{
 "storage-driver": "devicemapper",
 "storage-opts": [
   "dm.directlvm_device=/dev/nvme1n1",
   "dm.thinp_percent=95",
   "dm.thinp_metapercent=1",
   "dm.thinp_autoextend_threshold=80",
   "dm.thinp_autoextend_percent=20",
   "dm.directlvm_device_force=true"
 ]}
|
| btrfs | 40.5 |
mkfs.btrfs -f /dev/nvme1n1 && mount -o ssd -o autodefrag -o noatime /dev/nvme1n1 /var/lib/docker |
btrfs outperformed the other filesystems so it was selected for the demo system.
We expected that devicemapper would provide the best performance (since you are giving a block device to Docker). However, it makes sense that a modern file system would outperform devicemapper, given its widespread usage and design goals.
The following /etc/docker/daemon.json was defined to further expedite docker pull and docker push operations:
 {
  "max-concurrent-downloads": 50,
  "max-concurrent-uploads": 50,
  "storage-driver": "btrfs",
  "registry-mirrors": ["https://mirror.gcr.io"],
  "log-driver": "json-file",
  "log-opts": {"max-size": "10m", "max-file": "3"}
}
While this configuration has yielded the shortest startup times, the times vary with AWS responsiveness and the need for containers in the demo to become healthy (or be restarted when they are unhealthy).
Improving Demo Startup Reliability
Given the startup time of demos (and the requirement that not starting is not an option), the bidding/game-of-odds-playing we use on CI couldn’t be applied here.
So, if a spot block instance fails to be provisioned within 60 seconds (which has not yet happened), the above process is abandoned and a reserved instance is used, transparent to users.
Why Is This Better Than On-Demand Provisioning?
Always On vs. Always Available and AWS S3 vs. EBS
If you’re thinking that this sounds like something we could have used EC2 and EBS to do (or, even better, EC2’s new hibernate functionality), you are correct. However, the economics of that approach would be terrible.
While spot (and spot block) instances are discounted due to their limitations (reliability for spot and duration for spot block), EBS volumes associated with these instance receive no such discounts. EBS volumes are also slower than the SSDs that are used now.
In addition, we are able to be generous with disk usage, as we do not pay for the persistence of disk space only needed at runtime. We pay about 44 cents an hour for live demos (since that is the current “sweet spot” between demo performance and demo cost).
The following plots show the cost of the various approaches as the number of demos available and demo usage are increased. In these plots, On-Demand S3 is used for long-running instances and Spot Block S3 (avg. price) is used for everything else.

This plot is of the cost of the considered approaches during slow months as the number of demos increases.

This plot is of the cost of the considered approaches during busy months as the number of demos increases.

This plot is of the cost of the considered approaches while the number of demos remains static and demo hours scale.
As the plots show, of all the approaches considered, AWS S3 and “Always Available”are the most cost effective. The parameters and considerations used to generate these plots are in the tables at the end of this post.
System Portability
The demo system only requires a Docker Registry, configurable DNS, and a provisioner (or a pool of hosts if that’s asking too much) capable of executing a shell script and running Docker. It would not be difficult to run the system offline (or anywhere).
Tables on System Cost
The following tables (and the plots from it, above) ignore:
- S3 request costs for docker pull and docker push (they’re negligible given our usage of S3).
- Bandwidth costs ($0.02/GB) for docker push.
- Discounts from S3 storage passing thresholds.
- Discounts from using reserved instances.
- The fact that PENDING demos do not store any data in S3.
AWS/Approach Pricing
| Always On | Always Available | |||||
|---|---|---|---|---|---|---|
| Instance Pricing Option | On Demand EBS | On Demand S3 | On Demand EBS | On Demand S3 | Spot Block EBS (avg. price) | Spot Block S3 (avg. price) |
| Availability | Always On | Always On | Always Available | Always Available | Always Available | Always Available |
| Persistence Approach | Disk Centric | Data Centric | Disk Centric | Data Centric | Disk Centric | Data Centric |
| Instance Type | c5.4xlarge | c5d.4xlarge | c5.4xlarge | c5d.4xlarge | c5.4xlarge | c5d.4xlarge |
| Persistence | EBS | S3 | EBS | S3 | EBS | S3 |
| Disk Size | 100 GB | 400 GB | 100 GB | 400 GB | 100 GB | 400 GB |
| Data Size | 29 GB | 29 GB | 29 GB | 29 GB | 29 GB | 29 GB |
| EBS Pricing ($/GB/Month) | $ 0.10 | $ 0.10 | $ 0.10 | $ 0.10 | $ 0.10 | $ 0.10 |
| S3 Pricing ($/GB/Month) | $ 0.02 | $ 0.02 | $ 0.02 | $ 0.02 | $ 0.02 | $ 0.02 |
| Persistence Requirement | Disk Size | Data Size | Disk Size | Data Size | Disk Size | Data Size |
| Persistence Cost – Minimal Usable Disk Size ($/Demo/Month) | $ 10.00 | $ 0.67 | $ 10.00 | $ 0.67 | $ 10.00 | $ 0.67 |
Cost when Demo Hours are that of a Slow Month
| Always On | Always Available | ||||||
|---|---|---|---|---|---|---|---|
| Demos | Hours | On Demand EBS | On Demand S3 | On Demand EBS | On Demand S3 | Spot Block EBS (avg. price) | Spot Block S3 (avg. price) |
| 1 | 675 | $ 520.00 | $ 576.67 | $ 469.00 | $ 519.07 | $ 273.93 | $ 298.68 |
| 2 | 675 | $ 1,040.00 | $ 1,153.33 | $ 479.00 | $ 519.73 | $ 283.93 | $ 299.35 |
| 4 | 675 | $ 2,080.00 | $ 2,306.67 | $ 499.00 | $ 521.07 | $ 303.93 | $ 300.68 |
| 8 | 675 | $ 4,160.00 | $ 4,613.34 | $ 539.00 | $ 523.74 | $ 343.93 | $ 303.35 |
| 16 | 675 | $ 8,320.00 | $ 9,226.67 | $ 619.00 | $ 529.07 | $ 423.93 | $ 308.68 |
| 32 | 675 | $ 16,640.00 | $ 18,453.34 | $ 779.00 | $ 539.74 | $ 583.93 | $ 319.36 |
| 64 | 675 | $ 33,280.00 | $ 36,906.69 | $ 1,099.00 | $ 561.09 | $ 903.93 | $ 340.70 |
| 128 | 675 | $ 66,560.00 | $ 73,813.38 | $ 1,739.00 | $ 603.78 | $ 1,543.93 | $ 383.39 |
| 256 | 675 | $ 133,120.00 | $ 147,626.75 | $ 3,019.00 | $ 689.15 | $ 2,823.93 | $ 468.76 |
Cost when Demo Hours are that of a Busy Month
| Always On | Always Available | ||||||
|---|---|---|---|---|---|---|---|
| Demos | Hours | On Demand EBS | On Demand S3 | On Demand EBS | On Demand S3 | Spot Block EBS (avg. price) | Spot Block S3 (avg. price) |
| 1 | 1500 | $ 520.00 | $ 576.67 | $ 1,030.00 | $ 1,152.67 | $ 596.50 | $ 662.92 |
| 2 | 1500 | $ 1,040.00 | $ 1,153.33 | $ 1,040.00 | $ 1,153.33 | $ 606.50 | $ 663.58 |
| 4 | 1500 | $ 2,080.00 | $ 2,306.67 | $ 1,060.00 | $ 1,154.67 | $ 626.50 | $ 664.92 |
| 8 | 1500 | $ 4,160.00 | $ 4,613.34 | $ 1,100.00 | $ 1,157.34 | $ 666.50 | $ 667.59 |
| 16 | 1500 | $ 8,320.00 | $ 9,226.67 | $ 1,180.00 | $ 1,162.67 | $ 746.50 | $ 672.92 |
| 32 | 1500 | $ 16,640.00 | $ 18,453.34 | $ 1,340.00 | $ 1,173.34 | $ 906.50 | $ 683.59 |
| 64 | 1500 | $ 33,280.00 | $ 36,906.69 | $ 1,660.00 | $ 1,194.69 | $ 1,226.50 | $ 704.94 |
| 128 | 1500 | $ 66,560.00 | $ 73,813.38 | $ 2,300.00 | $ 1,237.38 | $ 1,866.50 | $ 747.63 |
| 256 | 1500 | $ 133,120.00 | $ 147,626.75 | $ 3,580.00 | $ 1,322.75 | $ 3,146.50 | $ 833.00 |
Cost when Demo Count is Static
| Always On | Always Available | ||||||
|---|---|---|---|---|---|---|---|
| Demos | Hours | On Demand EBS | On Demand S3 | On Demand EBS | On Demand S3 | Spot Block EBS (avg. price) | Spot Block S3 (avg. price) |
| 256 | 120 | $ 133,120.00 | $ 147,626.75 | $ 2,641.60 | $ 262.91 | $ 2,606.92 | $ 223.73 |
| 256 | 240 | $ 133,120.00 | $ 147,626.75 | $ 2,723.20 | $ 355.07 | $ 2,653.84 | $ 276.71 |
| 256 | 480 | $ 133,120.00 | $ 147,626.75 | $ 2,886.40 | $ 539.39 | $ 2,747.68 | $ 382.67 |
| 256 | 960 | $ 133,120.00 | $ 147,626.75 | $ 3,212.80 | $ 908.03 | $ 2,935.36 | $ 594.59 |
| 256 | 1920 | $ 133,120.00 | $ 147,626.75 | $ 3,865.60 | $ 1,645.31 | $ 3,310.72 | $ 1,018.43 |
| 256 | 3840 | $ 133,120.00 | $ 147,626.75 | $ 5,171.20 | $ 3,119.87 | $ 4,061.44 | $ 1,866.11 |
| 256 | 7680 | $ 133,120.00 | $ 147,626.75 | $ 7,782.40 | $ 6,068.99 | $ 5,562.88 | $ 3,561.47 |