There’s a notion that physical possession of a device will eventually lead to gaining privileged access on said device. While this is becoming increasingly less true due to technologies such as secure boot and tamper resistance, the thought still has merit. In this post, we will show how we investigated the Belkin WeMo switch (F7C027) and how we were able to run custom code in the bootloader that accesses flash as well as log into the device’s Linux console as root. Since Belkin’s firmware update process does not appear to update the device’s bootloader, we should be able to continue using our mechanism to gain local root access across updates.
Overview
There’s a notion that physical possession of a device will eventually lead to gaining privileged access on said device. While this is becoming increasingly less true due to technologies such as secure boot and tamper resistance, the notion still has merit. Cheap consumer electronics (CE) devices won’t be as locked down as, say, the guts of a fighter jet or even an expensive mobile phone, since it’s not worth the cost to do so. CE development cycles are often short, so engineers like having low-level access to the system all the way up through the manufacturing process. It costs time and money to fabricate and validate new boards, so while they may not be populated, debug interfaces, such as JTAG and serial ports, are likely to be present in production hardware. With physical access, one can also modify persistent storage directly or even influence a system’s RAM by injecting signals onto address or data lines. We decided to see if any such mechanisms would allow us to gain a root Linux console on the Belkin WeMo switch (F7C027).
While we developed a remote exploit for our target (see our other Breaking BHAD posts), we had minimal knowledge regarding the operating system’s internal workings. We weren’t attacking a black box – we had some of the device’s open source software and development tools [1] as well as a firmware update image that we deconstructed and partially disassembled. That being said, the feedback we were receiving was coarse-grained. We could see if the device rebooted or if we could access files using UPnP, but this kind of information will only get one so far.
Accessing a console of any sort would provide us with valuable introspection regarding the system’s functionality. Kernel and application logs directed to the console can provide useful information. With an interactive root console, we could get even finer-grained feedback, such as the contents of log files, a list of running processes, and whether or not we could affect the filesystem outside of the device’s public storage. We could even attach a debugger to our target processes and see precisely how we were affecting them.
Our proposed process for investigating the device’s hardware was fairly simple. We would:
- tear down the device,
- probe for debug ports,
- attempt to connect to the ports, and
- see what we could do with them as-is.
Thankfully, the open source community provided us with a head start. WeMo is based on OpenWRT – an open-source router firmware – and the OpenWRT researchers had already identified some of the device’s header and test point pinouts [2].
The Hardware
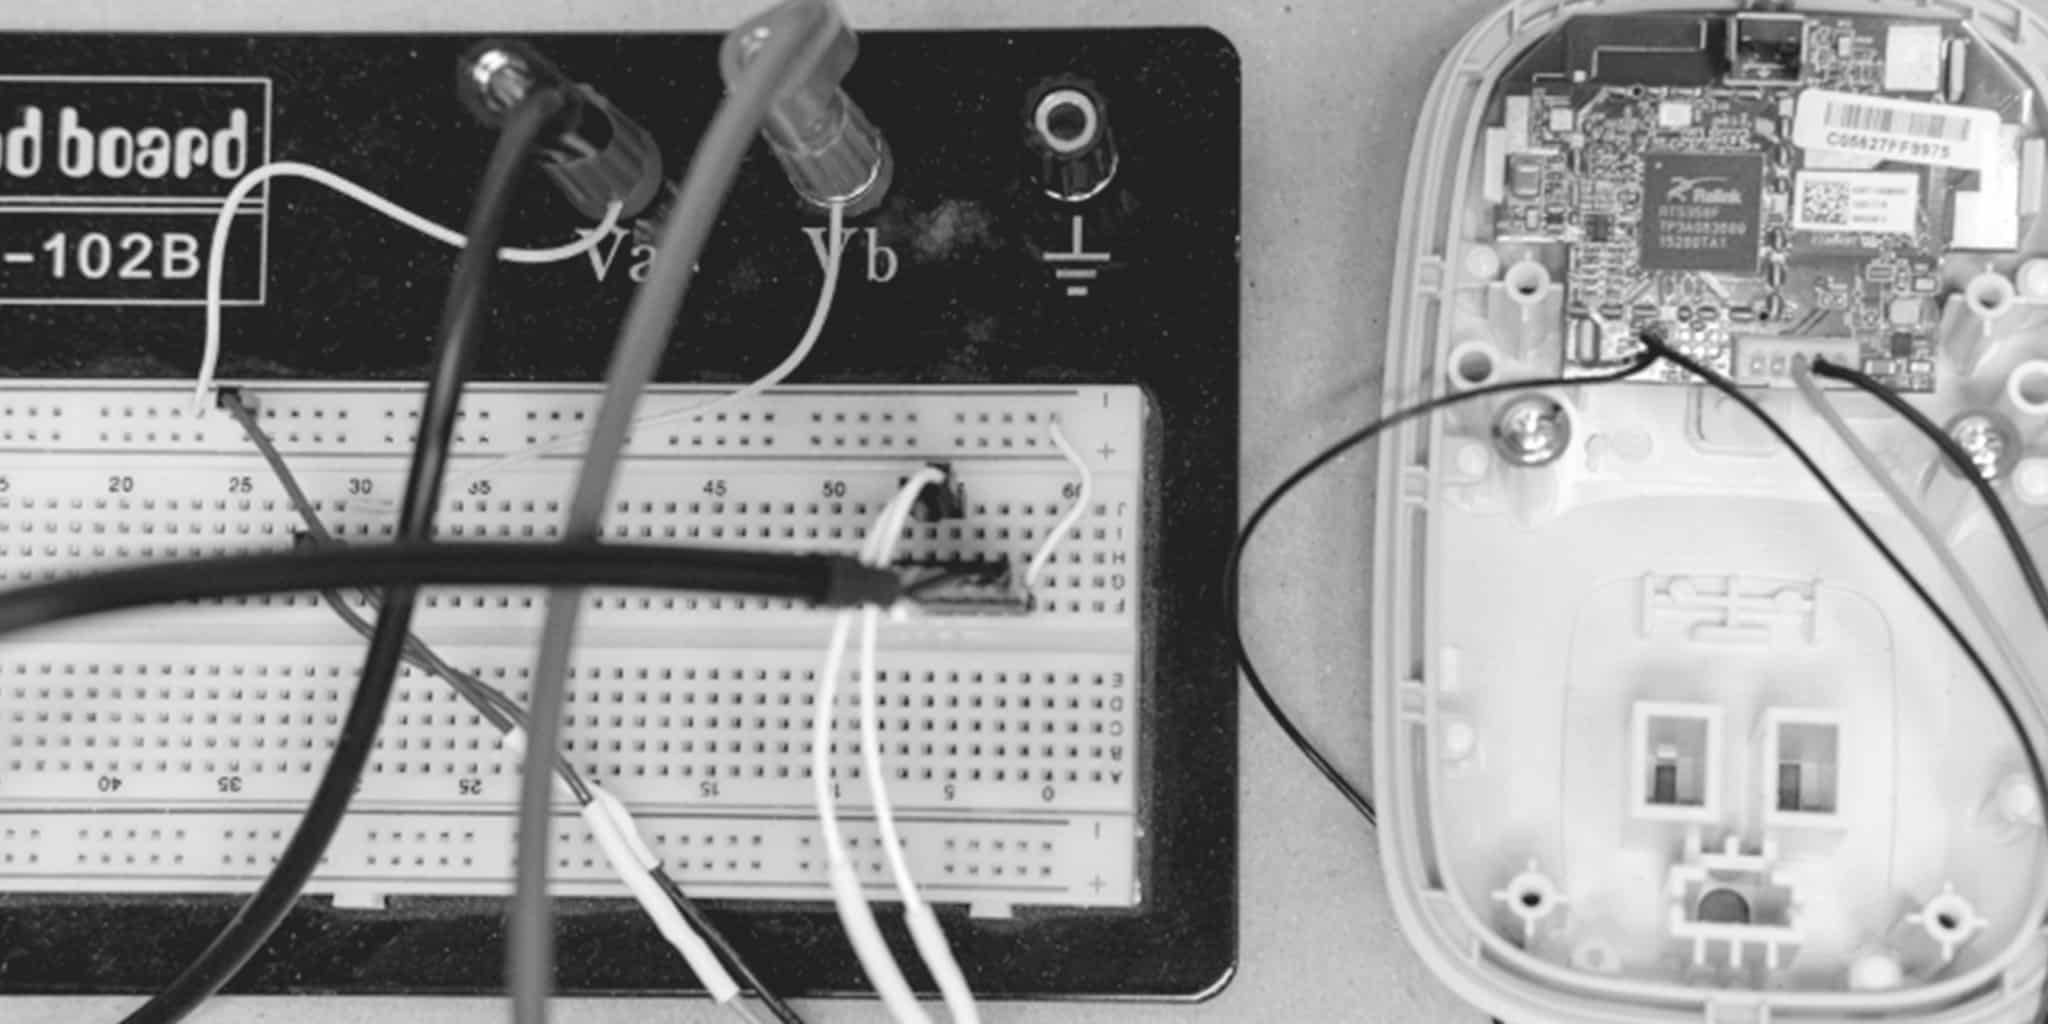
Figure 1 illustrates our vivisected device. We removed the application circuit (high-voltage relay board) and left only the logic board installed in the housing. Since the application circuit contained the logic board’s power supply, we built a cable to plug into header J2 to provide 5V from a benchtop power supply. To the left of J2 are the test points containing a debug serial port’s TX and RX pins. We had to solder to these directly. Finally, on the left side of the figure is our breadboard, which we used to co-locate all of our test leads and connect them to our power supply [3] and to a USB-to-serial converter [4].
Now that we had access to the logic board’s debug serial port and could power the board in isolation, we investigated to what degree this gave us access to the device. The serial port’s configuration was 57600,8N1. We used the Linux screen command to access the port, which provided us with a familiar-looking console.
screen -L /dev/ttyUSB0 57600
After allowing the device to boot fully, it presented us with a Linux login prompt. We tried logging in with no username. This didn’t let us in. We tried logging in as root with no password – no dice. We realized that we had the device’s /etc/passwd from the firmware update that we had deconstructed, and we were able to obtain the root user’s password hash. We fed the hash to our GPU farm for cracking, and, nine days later… someone else needed the GPU farm. The hash had resisted our attempts to discern its secrets. Try your own luck: $1$9CaSVCnb$y1c1i01eMl02W5pTmwehD1
The Bootloader and Directly Influencing Kernel Boot
We couldn’t log into the Linux console, so what other avenues did we have available? By analyzing the boot logs we saw that we could halt the boot process and break into the bootloader’s console by repeatedly pressing 4 during boot. The bootloader is a piece of software that loads and transfers control to the operating system kernel, so it operates with at least as high a privilege level as the kernel. The device uses U-Boot as its bootloader, which is a popular choice for embedded systems.
U-Boot often comes with features that allow one to affect the system’s boot process, such as RAM and flash modification functions, so we poked around to see what we had available. U-Boot also allows one to set environment variables that can, for example, pass different parameters to the Linux kernel. These variables are accessible using printenv to display variables, setenv to modify them, and saveenv to persist them across reboots.
Unfortunately, Belkin did not include much of U-Boot’s useful system modification functionality, such as raw flash modification or filesystem mounting commands. We assume they did this to enhance system security and reliability and/or to keep the bootloader as small as possible. Additionally, they modified the kernel loading and boot process to use a static set of parameters, so the kernel always booted with console=ttyS1,57600n8 root=/dev/mtdblock4 on our device. These parameters are telling the kernel how to configure its console (keep using the same serial port and configuration as U-Boot) and where to find its root filesystem. It was possible using environment variables to point the root filesystem to another partition on flash, as the device uses an A<->B process for reliable firmware updates, but we’d likely just have ended up pointing to an older or possibly corrupt root filesystem.
Fortunately, Belkin did include RAM access functionality. We could still peek all of system RAM byte-by-byte using md.b, and we could poke it with mm.b. On this system – and on many others – U-Boot executes from RAM. This meant that we could arbitrarily modify any of the running instance of U-Boot’s code or data with mm.b!
Initially U-Boot can be loaded anywhere, and this location is system-dependent, but it often relocates itself to the end of RAM to simplify loading and executing the OS at the beginning of RAM. As our console was very slow, we assumed this behavior and dumped only the last 1MB of memory to save ourselves some time. We converted the ASCII dump from the console to binary and scanned it for the kernel boot arguments. Figure 2 shows the arguments as well as their offset into the memory dump.
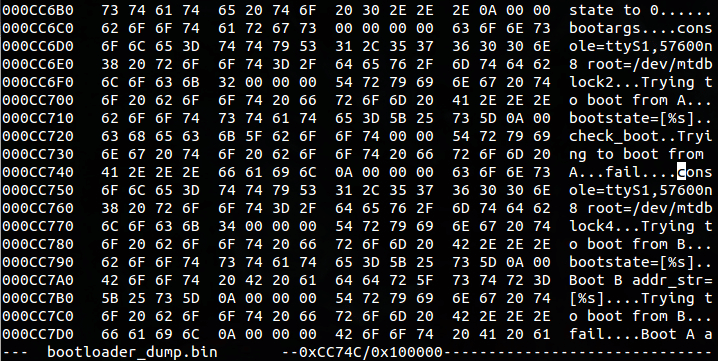
As can be seen in the figure, we didn’t have a lot of space to work with before the next data. However, the data immediately following the boot arguments consisted of informative strings from the boot logs. We were able to overwrite these strings without negatively affecting system functionality.
When the Linux kernel processes boot arguments, it directly consumes the ones it recognizes, such as global and module configuration parameters. The ones it does not recognize it passes through to the first userspace process, init, as parameters. We tried to utilize the former class of arguments to influence the kernel and the latter to influence init.
First we tried invoking single-user mode, which halts the Linux boot process at an early stage and provides the user with an authentication-free root console. This is analogous to recovery mode on more modern desktop Linux distributions. init ignored S, 1, and single and proceeded with the normal boot sequence.
Then we tried setting init=/bin/sh. This tells the kernel to run /bin/sh as the init process instead of /sbin/init, which should provide the user with a console running as root rather than continue the normal boot sequence. When we tried this, we were presented with what appeared to be a halted system. However, some light kernel source code browsing and boot log analysis told us that, while we were successfully executing /bin/sh as init, no /dev/console node was present on the root filesystem. init’s stdin, stdout, and stderr are set to /dev/console by the kernel, and since that device node didn’t exist, we could not interact with the process. We tried using kernel parameters to assign a temporary RAM-based root filesystem containing the node, but some tests, as well as some more source analysis, told us that Belkin had not built initrd or initramfs support into the kernel.
Once we realized we could start /bin/sh but not interact with it directly, we tried providing it a sequence of commands with -c. Our first few attempts did not work, and we didn’t have any feedback telling us what was and was not working, so we decided to table this method for the time being.
Indirectly Influencing Kernel Boot Using the Filesystem
If we couldn’t modify the kernel boot process directly to provide us with a root console, could we indirectly modify the boot process using the root filesystem? This seemed likely, since the root contains scripts run on every boot as well as the authentication credentials for each user. As we mentioned previously, this U-Boot did not contain functionality to arbitrarily access, much less modify, flash storage.
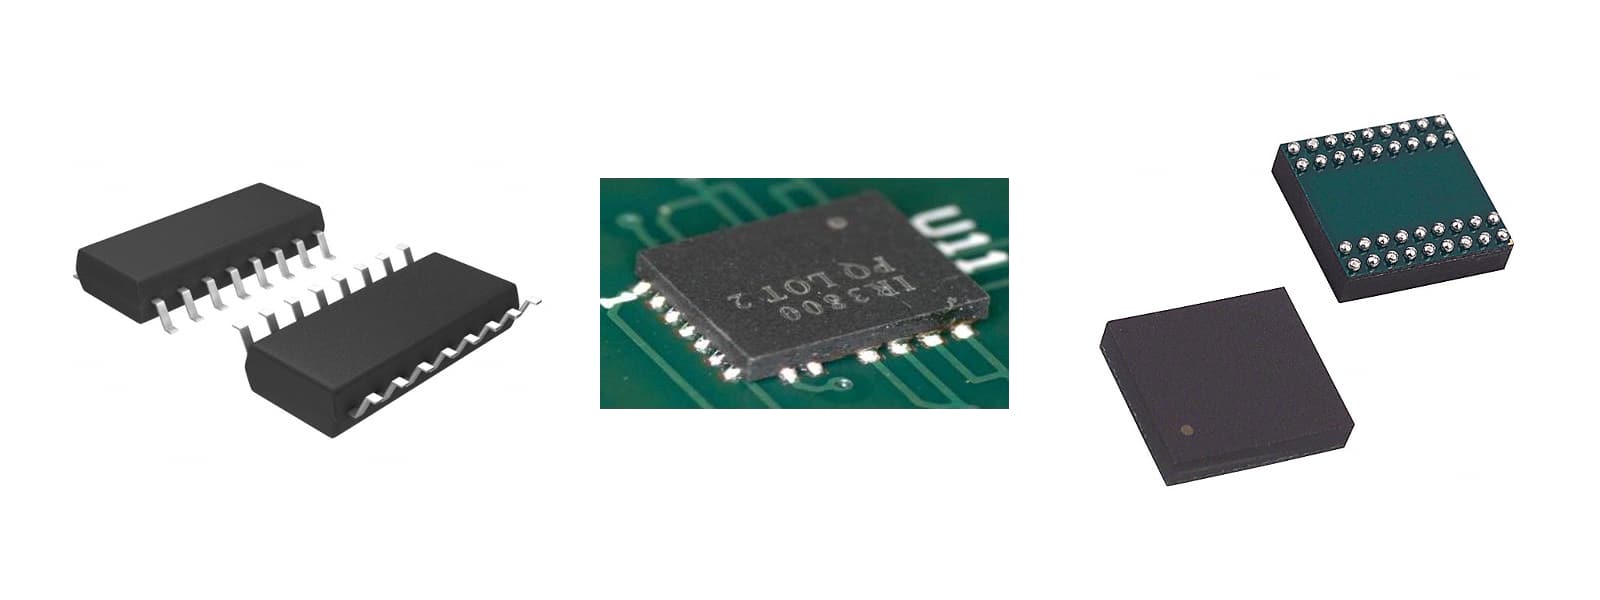
The flash chip on the device was a small outline package (SOP) with reasonably large pins. It would have been easy to clip onto this device with an external flash reader/writer and perform modifications out of band of the logic board’s normal operations. However, many flashes are not so easy – and sometimes practically impossible – to physically access, such as those with quad flat no-leads (QFN) or ball grid array (BGA) packages. The differences in these packages can be seen in Figure 3. We also already had console access to U-Boot, so we wanted to see what we could do with just the connections currently in use.
Previously we had modified U-Boot’s data using mm.b. Could we modify its code, too, to give us arbitrary flash access? While this would have been a fun challenge to take on, it ended up being unnecessary. The loadb and go commands were still in the bootloader. We could use loadb on the device and kermit on our host to deliver a separate program and go to jump to and execute it. This program could coexist with, and even return back to, U-Boot.
We developed such a program that could read, erase, and write the flash arbitrarily by talking to it over a serial peripheral interface (SPI) link. It could also accept input from and provide feedback to the user over serial. More detailed information, including the code itself, is available at [8].
Modifying the Flash to Get Root
After developing our program, our first order of business was to dump the entire contents of the flash. Previously, all we had to work with was a factory update image containing a subset of the whole flash contents. At our serial data rate, this took around 40 minutes. With this dump, we could analyze the entire flash for ways to gain access to the device. We validated that our update image and the flash dump contained the same data where appropriate. Any analysis we had done, or would continue to do, on the update image would still be valid.
To reiterate the goal of our efforts up to this point, we were trying to gain root access to the Linux console to get more information about the running system. Without doing anything to the device beyond soldering on our serial connection, we could get to the console but did not have the credentials required to get past its login prompt. The simplest way to get past the credential check while minimally affecting the device’s operation would be to remove the root password hash or replace it with a known value. On our target, this value was stored in /etc/passwd.
Before we could modify the filesystem, we needed to figure out its location and format in flash. To do the latter, we again analyzed our unpacked update image. The root filesystem was not monolithic. It contained a static read-only SquashFS filesystem area and a dynamic read-write JFFS2 area.
At system boot, only the static area is used. During the initialization process, the dynamic area is overlaid on top of the static one with mini_fo [9], and the root filesystem is pivoted to the mini_fo overlay. When the overlay is accessed for reads, mini_fo first checks the dynamic area for the file and, if it’s not present there, checks the static area. All writes to mini_fo resolve to the dynamic area. This behavior is illustrated in Figure 4.
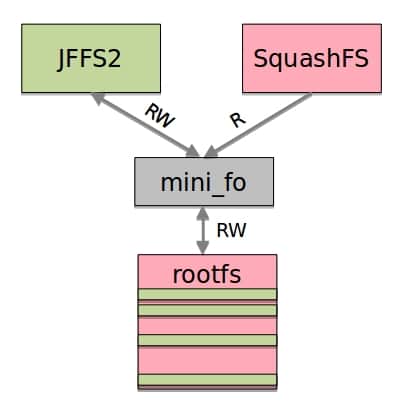
Consequently, from now on we could mostly ignore the SquashFS and focus on the JFFS2. From the kernel boot logs, we knew the root filesystem was located at /dev/mtdblock4 and that this partition’s boundaries were [0x008c0000, 0x00f30000]. We copied the partition to its own file with:
dd if=switch_flash of=mtdblock4 bs=$((0x10000)) skip=$((0x8c)) count=$((0xf3 - 0x8c))
and used binwalk to mark the boundaries of the filesystem areas:
DECIMAL HEXADECIMAL DESCRIPTION
--------------------------------------------------------------------------------
0 0x0 Squashfs filesystem, little endian, version 3.0, size: 3627279 bytes, 534 inodes, blocksize: 65536 bytes, created: 2015-12-16 17:32:39
3670016 0x380000 JFFS2 filesystem, little endian
The JFFS2 area’s boundaries were [0x00c40000, 0x00f30000]. We copied this data to its own file with dd, as well.
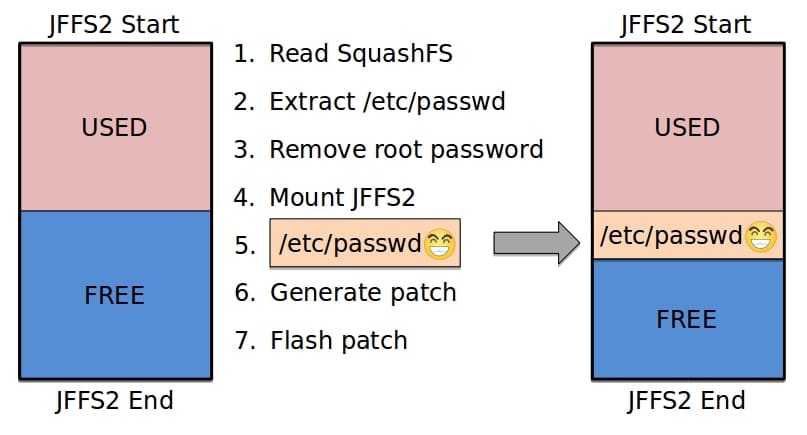
Now that we had the JFFS2 area from the device isolated on our development host, we could add a file to it that overlays the stock /etc/passwd from the SquashFS. A fairly common practice in this situation is to provide the filesystem data as the backing file for a loopback device and mount the loopback. However, one does not simply loopback mount a data file containing a JFFS2 filesystem. JFFS2 is meant to run on top of a memory technology device (MTD) layer, so we needed to mount an emulated MTD device instead of a standard block device. Information regarding how to do this can be found in [8].
After we mounted the JFFS2, we modified /etc/passwd from the update image to remove the root password hash. We copied this modified file into the JFFS2 and unmounted the filesystem without destroying the emulated MTD. Finally, we generated a binary diff between the original JFFS2 area and the emulated MTD. This ~270 byte patch would be the only change we’d need to write to give ourselves a local root console.
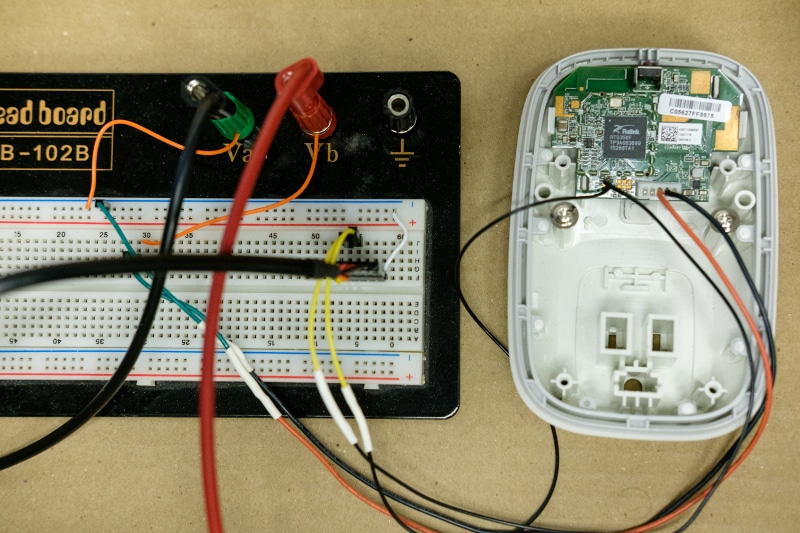
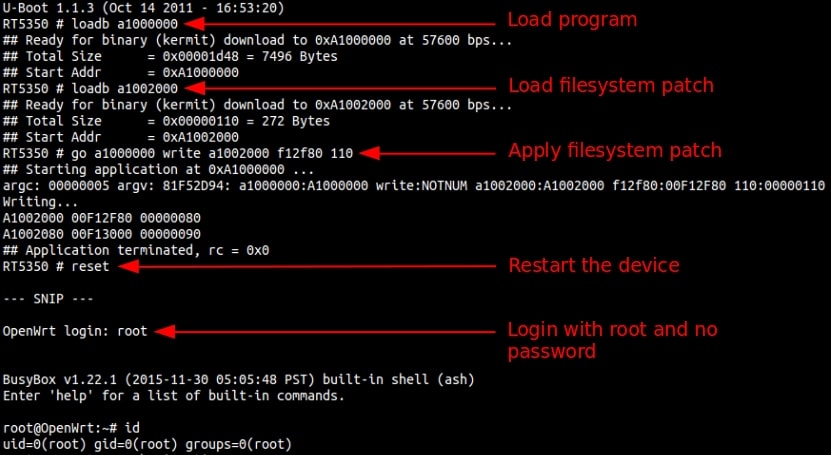
We delivered the patch to the device using loadb and applied it using our program. After we restarted the device, we were able to log into the Linux console as root without entering a password. This process is illustrated in Figure 5, and a terminal capture of the process is shown in Figure 6.
Takeaways
WeMo Hardware is Not Locked Down
While many embedded devices, such as mobile phones, might be moving towards more secure, tamper-proof hardware and software, it’s still often the case that possession equals some form of privileged access. With the WeMo switch, we had bootloader-level console access by default, and we were able to get root access in Linux through the bootloader with our custom flash read/erase/write program.
Vendors who want to harden their systems should make sure they eliminate user access to the bootloader and should remove unnecessary debug interfaces from their production circuit boards. They should also investigate the appropriate secure boot technologies for their platforms. This could allow them to develop systems that run only authorized firmware (which should include important system files, such as an embedded device’s static /etc/passwd).
Rooting Method is Generally Applicable
Our rooting method is not specific to this target device. The overlay filesystem mechanism is used by OpenWRT, so products derived from OpenWRT, including other Belkin WeMo devices, should be rootable using this method. (Note that mini_fo has been replaced by overlayfs in newer versions of OpenWRT.)
Different devices may use different versions of U-Boot, processors, and flash and RAM layouts, so the particulars of our flash modification program could vary per target. Other devices may also not have easily-accessible debug ports. With these caveats in mind, it may be desirable to simply clip onto a new device’s flash and use an external reader/writer. In this case the filesystem structure analysis and modification techniques are still valid, and the U-Boot and architectural differences are moot points.
References
[1] http://cache-www.belkin.com/support/dl/F7C027-F7C028.tar
[2] https://wiki.openwrt.org/toh/belkin/f7c027
[3] http://www.bkprecision.com/products/power-supplies/9110-100w-multi-range-60v-5a-dc-power-supply.html
[4] TTL-232R-3V3, http://www.ftdichip.com/Support/Documents/DataSheets/Cables/DS_TTL-232R_CABLES.pdf
[5] http://media.digikey.com/renders/Fujitsu%20Micro%20Renders/16-SOP%20PKG.jpg
[6] http://www.solder.net/images/qfn/QFN_wetting_evident.jpg
[7] https://www.digchip.com/datasheets/photos/280/DS32KHZBGA.jpg
[8] https://github.com/twosixlabs/breaking_bhad/tree/master/spi_flash
[9] http://www.denx.de/wiki/bin/view/Know/MiniFOHome


Bridging the gap between the impossible and the practical with innovative technology solutions in cyber, data science, mobile, microelectronics and information operations and a full spectrum of products and capabilities to advance national security missions.