One of the more interesting aspects of Capture the Flag (CTF) events is the frequent necessity to pick up, learn, and apply various reverse engineering and binary analysis tools to solve difficult challenges. Recently I completed The FireEye FLARE-On 2017 challenges, requiring me to add a few tools to my binary analysis VM. I’d like to share those tools in this blog post, and show how they helped me complete the challenges.
PHP Dynamic Analysis Environment Using XDebug
In my position at Two Six Labs, I primarily work in binary reverse engineering and analysis, so web-based challenges in CTF’s typically involve some ramping-up on my part to successfully complete. PHP, for those unfamiliar, is a scripting language that is used for server-side applications, as opposed to JavaScript, which is typically used for client-side applications. Static and dynamic analysis of JavaScript is relatively straightforward – most browsers have Developer Tools which will allow you to interactively view and debug JavaScript. However, setting up a PHP debugging environment proved to be slightly more complicated.
The Challenge
For the tenth challenge of the FLARE-On 2017 challenges, we were presented with this PHP script.
<?php
$o__o_ = base64_decode('<Base64 block omitted>');
$o_o = isset($_POST['o_o']) ? $_POST['o_o'] : "";
$o_o = md5($o_o) . substr(MD5(strrev($o_o)), 0, strlen($o_o));
for ($o___o = 0; $o___o < 2268; $o___o++) {
 $o__o_[$o___o] = chr((ord($o__o_[$o___o]) ^ ord($o_o[$o___o])) % 256);
 $o_o .= $o__o_[$o___o];
}
if (MD5($o__o_) == '43a141570e0c926e0e3673216a4dd73d') {
 if (isset($_POST['o_o']))
 @setcookie('o_o', $_POST['o_o']);
 $o___o = create_function('', $o__o_);
 unset($o_o, $o__o_);
 $o___o();
} else {
echo '<form method="post" action="shell.php"><input type="text" name="o_o" value="
"/><input type="submit" value=">"/></form>';
}
?>
Essentially, a large, base64-encoded blob is decoded, decrypted with a key, and executed as a second-stage PHP function. The key begins with the MD5 hash of the $o_o variable (this is the flag for the level). Appended to the MD5 hash is the reverse string’s MD5 hash string truncated to the length of the flag. Assuming the flag has a length greater than 0, we can conclude that the key needed is between 32 and 64 characters (2 characters to represent a byte in a hex string).
It’s going to take a bit of manual scripting, a debugger and some intuition to crack the correct key string. So let’s get a development/debugging environment set up, shall we?
The Environment
I built a development/debugging environment for this challenge in a 64-bit Ubuntu 16.04 LTS virtual machine. First, I installed the PHPStorm IDE using instructions found on the website here. Next, create a project, and copy/paste the shell.php code into it and save it.
I then installed XDebug on the virtual machine using the package manager:
sudo apt-get install php-xdebug
Now that we have a development environment set up and a debugger, we need to be able to have them talk to each other to debug our PHP script. First, we must configure PHP to know about XDebug and it’s required parameters – namely, a port and host to send debug messages to. Navigate to the /etc/php/7.0/cli directory and edit the php.ini file contained therein to include these lines.
zend_extension = /usr/lib/php/20151012/xdebug.so
xdebug.remote_enable=1
xdebug.remote_port=9000
xdebug.remote_host=127.0.0.1
xdebug.idekey=PHPSTORM
These environment variables tell the php process where the XDebug library is (you may need to edit the zend_extension variable accordingly), enable remote debugging, establish the debugging host and port, and identify the key of the IDE we are using to debug (in this case, PHPSTORM). Save the file and go back to PHPStorm so that we can configure it.
In PHPStorm, go to File -> Settings -> Languages & Frameworks -> Debug and ensure that the “XDebug” settings look like the following:

Next, install the XDebug extension for the browser that you will be navigating to the PHP Script with – this extension will communicate with PHPStorm for debugging. I followed the instructions for Google Chrome, here.
Now, we’re ready to start our PHP server, navigate to the page and debug our PHP script. In PHPStorm, set a breakpoint on the first line of the PHP script and then click Run->”Start Listening For PHP Debug Connections.” Next, in a terminal navigate to the PHPStorm project directory and start the server using the following command:
php -S 127.0.0.1:8888
Now, you can navigate to http://127.0.0.1:8888/shell.php and, if all is configured correctly, your breakpoint should be hit. We can now start writing more code and debugging!
Challenge Solution
The first thing we need to do is to write some crude PHP code to determine the length of the key as well as possible characters. We know that the length of the key string is somewhere between 33 and 64, we also know that the key string consists of only the characters ‘a’ – ‘f’ and ‘0’ – ‘9’ because those characters are the only ones that can appear in a hash digest. We also hope that the plaintext will only be readable characters because it is PHP code, so it will only contain alphanumeric characters, tab, newline, and carriage return. Using this knowledge, we can write some PHP code to print out all possible lengths and possible characters at each position. My code to do this is shown below
<?php

$possible_chars = array( '0','1','2','3','4','5','6','7','8','9','a','b','c','d','e','f');
$massive_string = base64_decode('<Base64 Omitted');

for($k = 33; $k <= 64; $k++) {
    for($i = 0; $i < $k; $i++) {
        foreach ($possible_chars as $c) {
            $key = $c;
            $found = TRUE;
            for ($j = $i; $j < strlen($massive_string); $j += $k) {
                $s = chr((ord($massive_string[$j]) ^ ord($key)) % 256);
                // Tab, Newline or Carriage Return
                if (ord($s) == 9 || ord($s) == 13 || ord($s) == 10) {
                    $key = $s;
                    continue;
                }

                # Non-printable
                if (ord($s) < 0x20 || ord($s) >= 0x7f) {
                    $found = FALSE;
                    break;
                }
                $key = $s;
            }
            if ($found == TRUE) {
                printf("%d %d %s<br><br>", $k, $i, $c);
            }
        }
    }
}

?>
This code will only display a length if it has found a position that results in only readable ASCII characters in the plaintext. The only key length which gives a possible character for every position within the key is length 64 – therefore the key length is 64. Below are all the possible characters for each character position in the key (tabulated nicely by the challenge author https://www.fireeye.com/content/dam/fireeye-www/global/en/blog/threat-research/Flare-On%202017/Challenge10.pdf). You can try this code out by simply commenting out the shell.php code in PHPStorm, pasting the code in and refreshing your page (this is why development environments are helpful!).
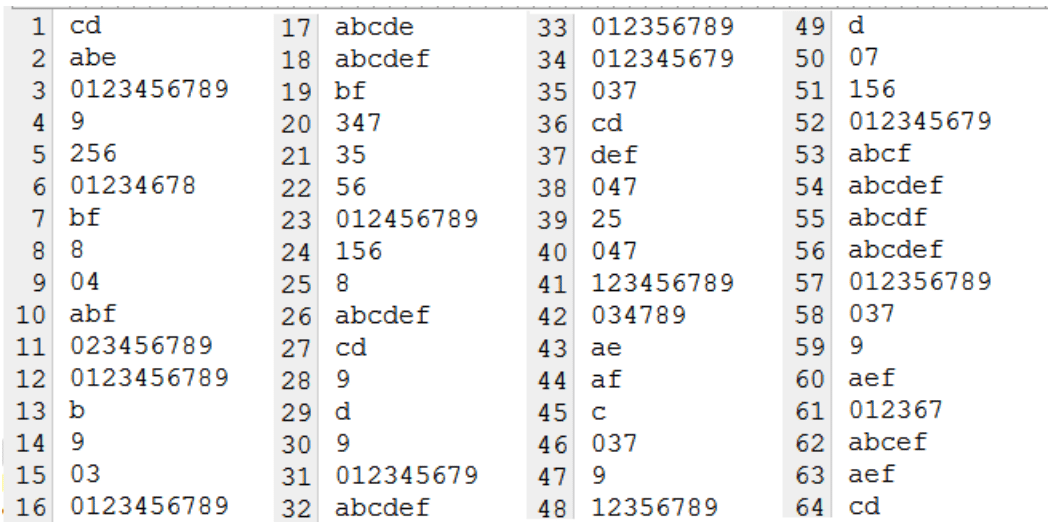
We can begin constructing the key using these values where the possible characters are unique. Then we can use our debugger to inspect the decrypted PHP code. An example of this is shown below:
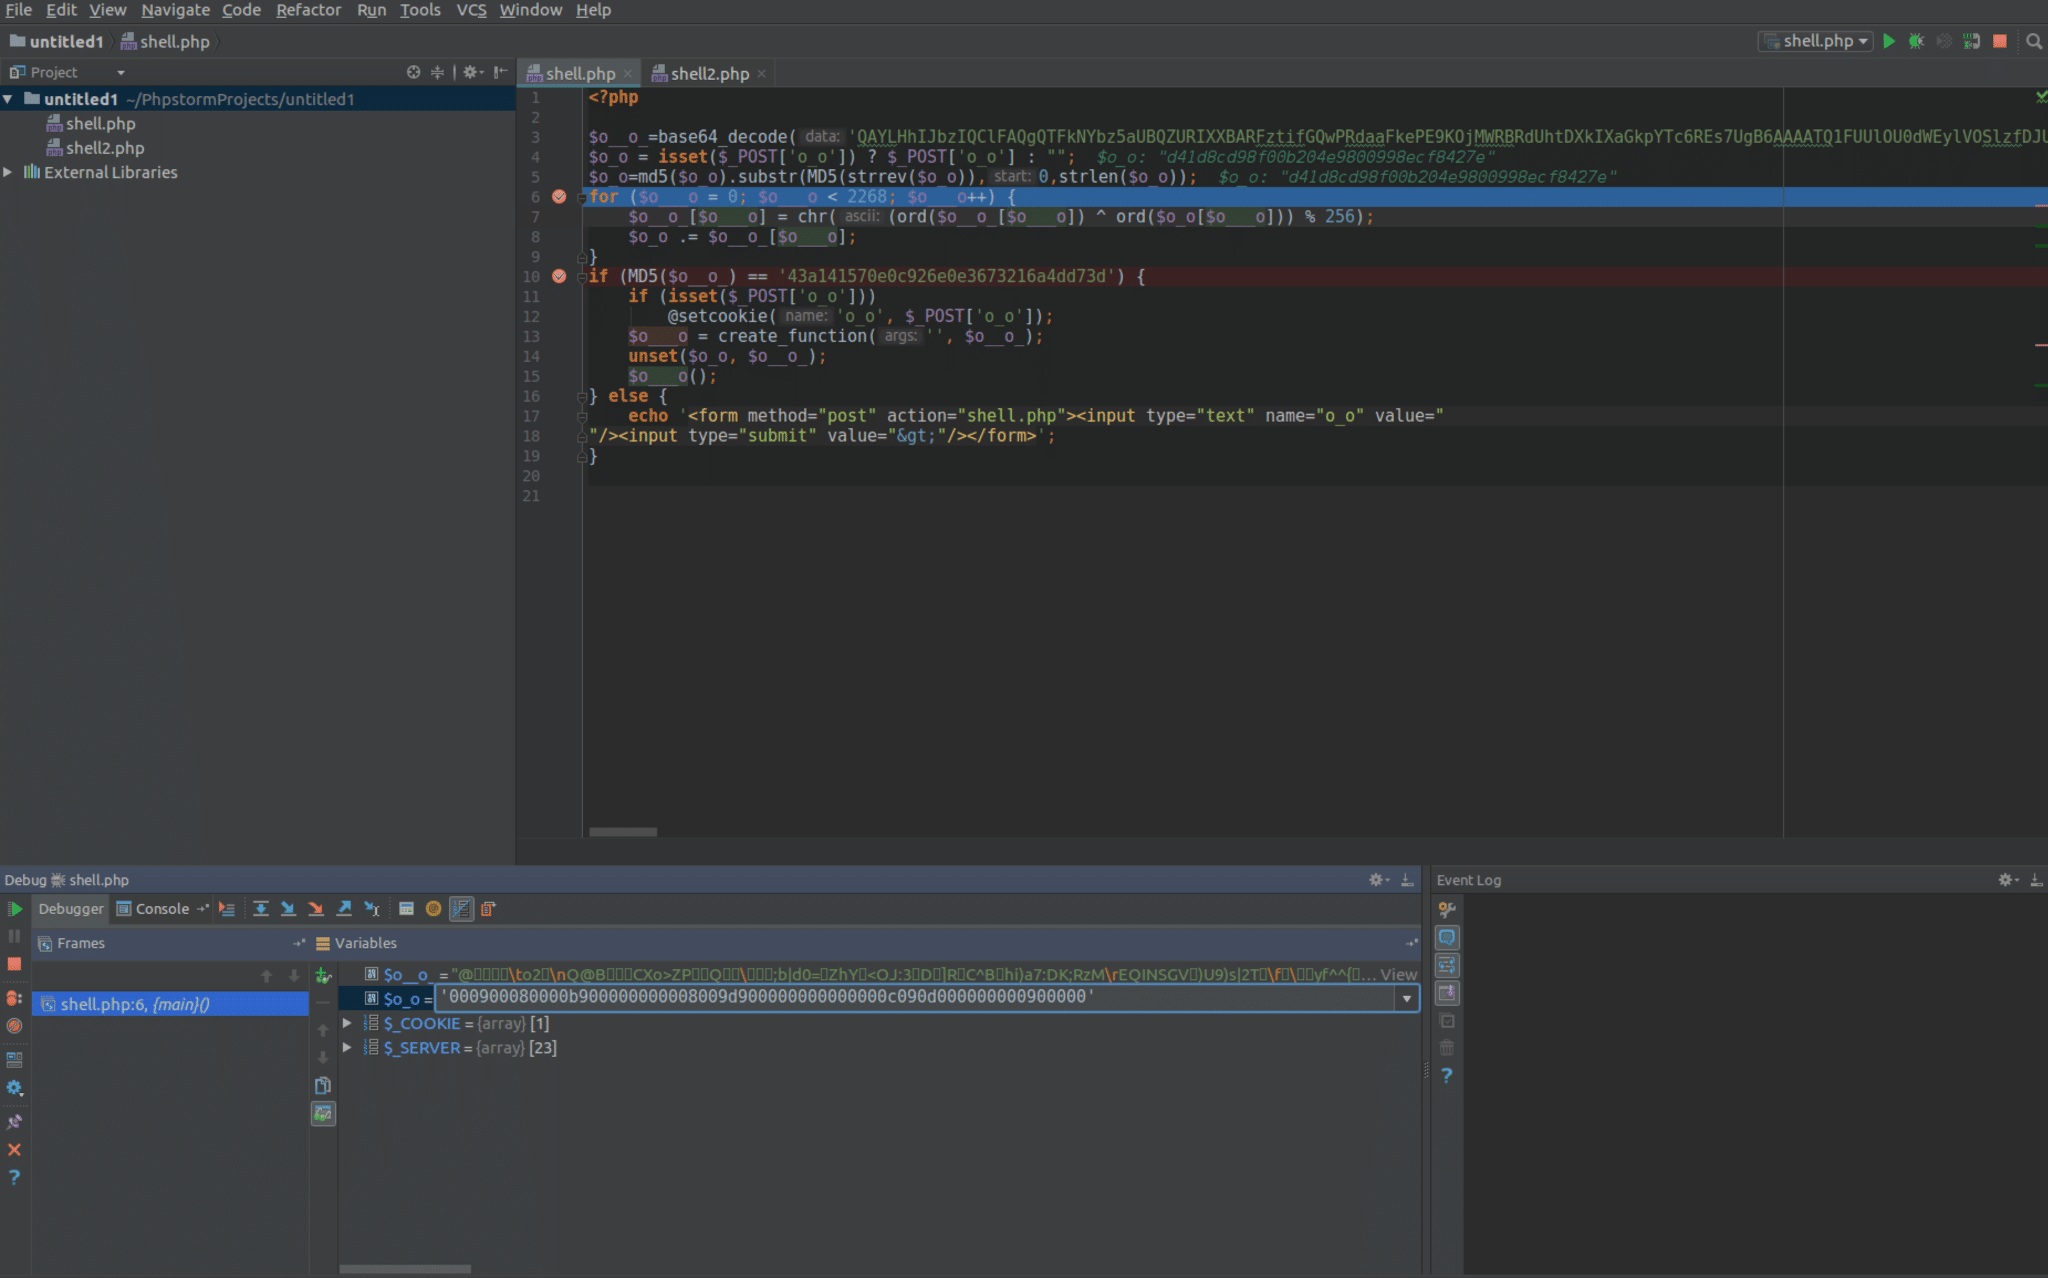
We can then identify PHP keywords (such as “b–e64” at index 716) in the decrypted output and use the console and debugging features of PHPStorm to reconstruct the entire key through trial and error and a little bit of intuition – we finally get the key string “db6952b84a49b934acb436418ad9d93d237df05769afc796d067bccb379f2cac.” We can then pull the stage 2 PHP code out from the debugger and put it into it’s own script within the project – I called this “shell2.php,” and it is shown below.
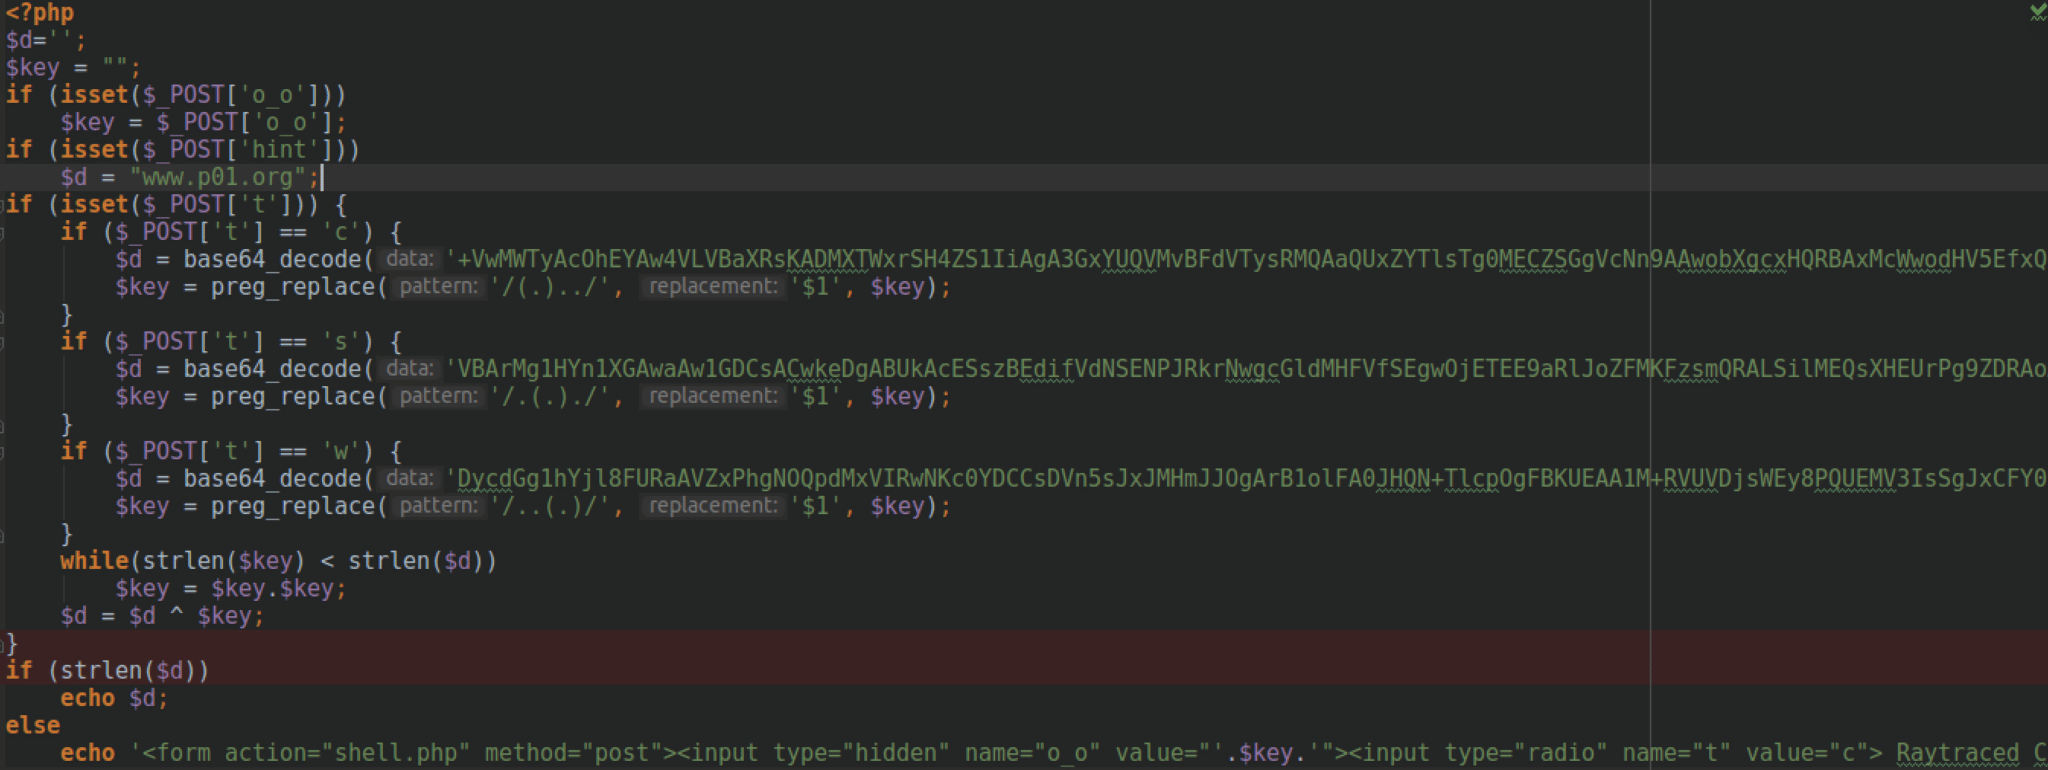
shell2.php takes the initial “$o_o” variable (the flag for the challenge) and splits it into three strings. These three strings act as keys to decrypt one of three HTML pages showing JavaScript animations sourced from http://www.p01.org. Knowing this, we can use a similar tactic to the first part of the challenge – use known plaintext to derive the key. We know that the plaintext for each encrypted blob will start with ‘<html>’, so we can set breakpoints with PHPStorm at the decryption stage for the blob to derive the first few bytes of the key using the debugging console.

Using the first decrypted blob and breaking at the point before decryption, we can use the debugger console to XOR the ciphertext blob with “<html>” to get the first few bytes of the key – “t_rsaa.” The only mystery remaining is – how do we figure out the exact key length? Well, the answer actually lies in the encrypted blob itself – there is a string of 13 0x0 bytes – indicating that the key and plaintext matched in these places – we can therefore try a key length of 13, and see if we get the correct plaintext. In order to get the plaintext, we pad “t_rsaa” to 13 bytes, use the debugging console and look for keywords in the resultant plaintext string to derive the remaining key bytes.
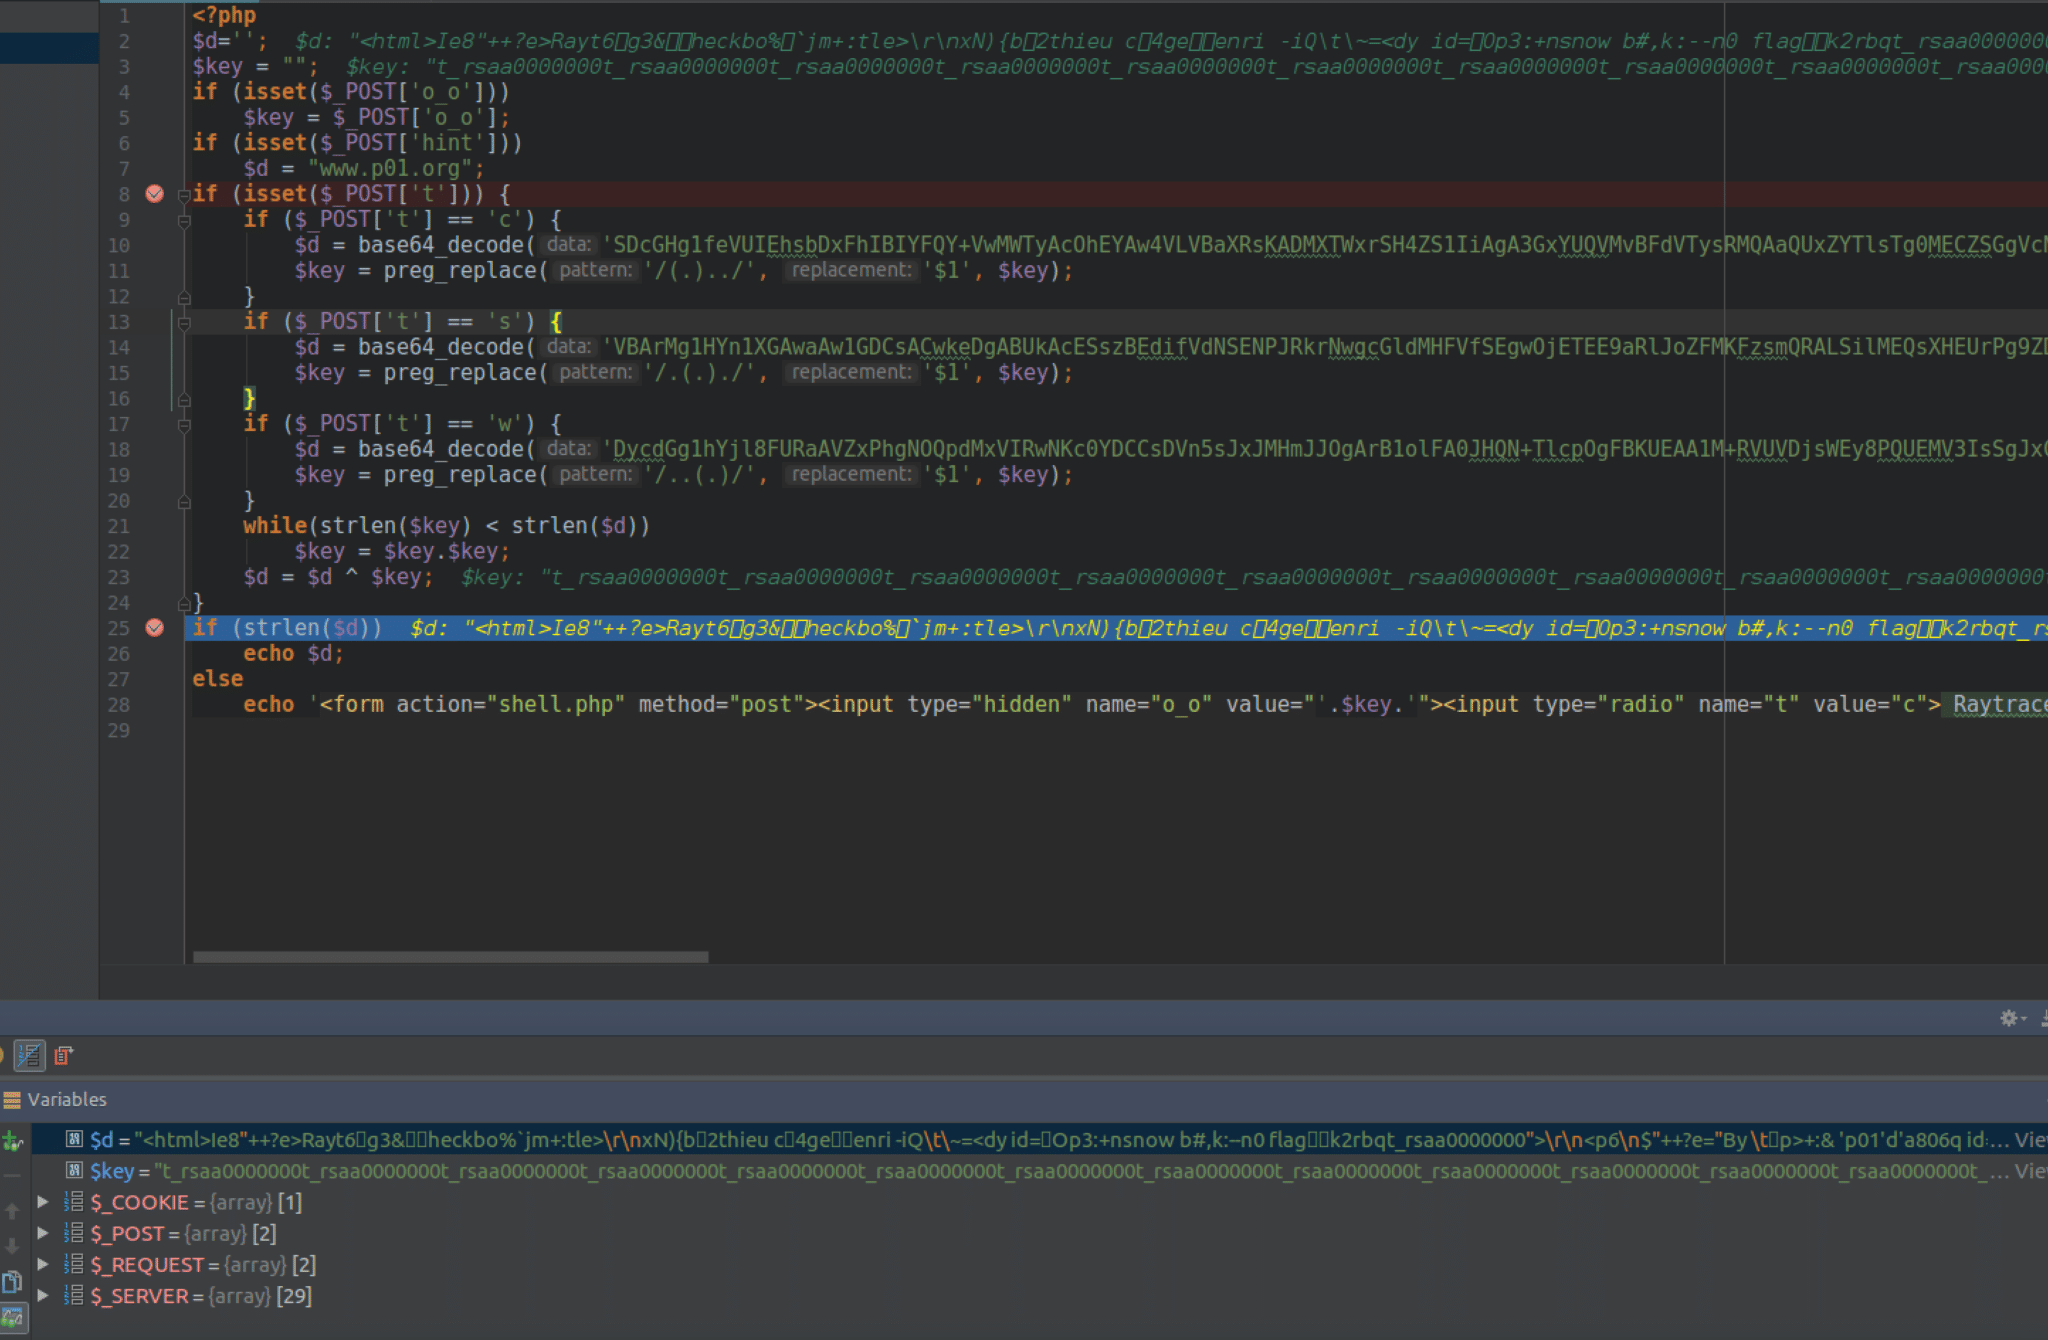
As we can see in the above debugging session, after padding out the key to 13 bytes, familiar strings start to appear. “Ray” and “heckbo” are more than likely part of the string “Raytraced Checkboard.” This allows us to figure out the key bytes for the rest of the first blob. The key bytes for the first blob are “t_rsaat_4froc”. If we repeat this strategy for the other ciphertext blobs, we get “”hx__ayowkleno” and “[email protected]”. Using these we can reconstruct the flag by taking one character at a time from each string, which yields “[email protected].”
Atmel AVR Simulation Using simavr
I am always interested in performing binary analysis on architectures that are different than the standard x86/x64/ARM/AArch64 binaries that run on most modern mobile and desktop machines. In the FLARE-On 2017 challenges, I encountered an Atmel AVR binary – more specifically, a .hex file meant to be run on an Arduino board using an ATMega328p processor. Unfortunately, when I was working on the challenge, I did not have an Arduino handy, so I had to find a tool which would allow me to potentially simulate one.
The Challenge
Challenge 9 of the 2017 FLARE-On challenges presents the analyst with a .hex file along with a description that alludes to an Arduino board. The challenge description provides no other background information. The .hex file was a series of ASCII representations of hexadecimal strings, so I copied those into a text editor and found the string “Flare-On 2017 Adruino UNO Digital Pin state:.” The Arduino UNO uses an an 8-bit ATMega328p processor. Knowing this, we can start to build an analysis environment.
The Environment
For static analysis. the easiest tool I found to use was IDA Pro – a staple of any reverse engineer’s toolkit. IDA Pro is able to ingest the raw .hex file and disassemble it, provided the instruction type is changed to “Atmel AVR” in the “Load a new file” dialog, as shown below.
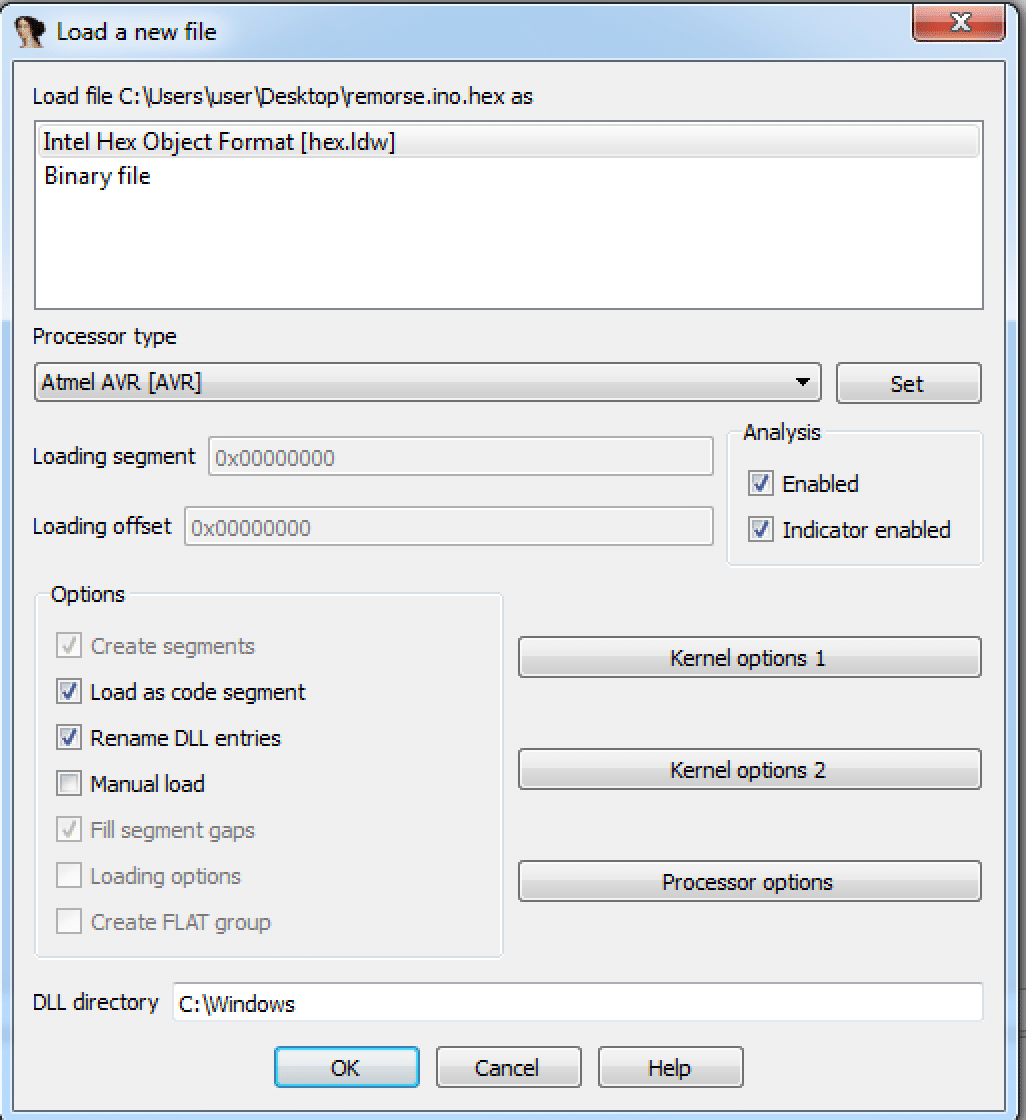
After that, IDA will prompt the user to select a processor. My version of IDA Pro didn’t have “ATMega328p” as an option, so I went with “ATmega103_L” – same processor family. After that, the AVR opcodes should show up.
For dynamic analysis. I decided to use simavr. Simavr is a Python emulator for Atmel AVR processors. What makes this especially attractive is that it has fully working GDB support – meaning that we can actually debug at the assembly level. The GitHub page for simavr contains installation instructions.
Challenge Solution
After performing static analysis for a little while in IDA, i came across a function that looked suspiciously like a decryption loop. This is shown below.
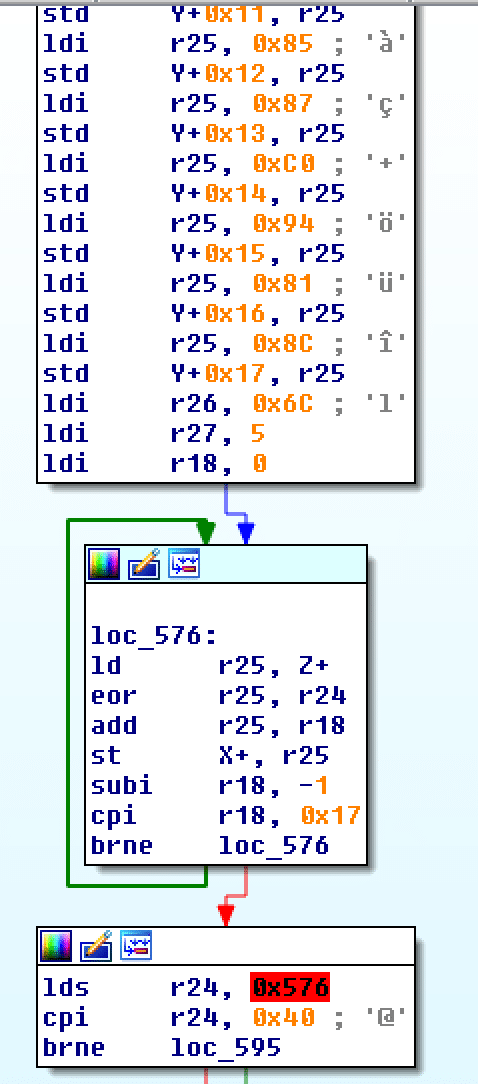
A set of 23 of static bytes are inserted into an array pointed at by the “Y” register (Because the ATMega328p is an 8-bit processor, it uses three special memory-access registers called “X,” “Y,” and “Z.” The X register is based on r27:r26 , the Y register is based on r29:r28 and the Z register is based on r31:r30). These bytes are XOR’d with a key byte that is stored in r24 (Z and Y are pointing to the same array) and then the index of the array is added to the byte value. This is then stored in an array pointed to by the X register. After the decryption routine, we see that the value at memory address 0x576 is compared to the ‘@’ character – indicating a correct decryption. We know that FLARE-On challenge flags are in the form of an email address, so we just need to figure out what index in the array of size 23 the ‘@’ character is. Then we can write a routine to brute force the constant key byte and then pull the decrypted flag out of memory. We can use simavr with gdb to do this. First, we start simavr with the following command line.
run_avr -m atmega328p -f 160000000 --gdb remorse.ino.hex
Then, in a separate terminal, we can attach to the simulator with gdb using the following command:
avr-gdb -ex "target remote:1234"
We can then set breakpoints within the AVR code. First, we set a breakpoint at what IDA identifies as “loc_576” but is actually at 0xAEC in memory. To do this, we have to use the gdb command br *$pc + 0xaec . For some reason, only setting a breakpoint from a pc-relative offset works with simavr (at the beginning of execution, $pc is at 0x0). We can continue the program and, when it breaks, we can then run an info reg command to figure out what address the X register is pointing to.
(gdb) info reg
r0             0x80     128
r1             0x0      0
r2             0x0      0
r3             0x0      0
r4             0x0      0
r5             0x0      0
r6             0x0      0
r7             0x0      0
r8             0x0      0
r9             0x0      0
r10            0x0      0
r11            0x0      0
r12            0x0      0
r13            0x0      0
r14            0x0      0
r15            0x0      0
r16            0x0      0
r17            0x0      0
r18            0x0      0
r19            0x0      0
r20            0x2      2
r21            0x0      0
r22            0xa      10
---Type <return> to continue, or q <return> to quit---
r23            0x5      5
r24            0xff     255
r25            0x8c     140
r26            0x6c     108
r27            0x5      5
r28            0xf6     246
r29            0x7      7
r30            0xf7     247
r31            0x7      7
SREG           0xb5.    181
SP             0x8007f6 0x8007f6
PC2            0xaec    2796
pc             0xaec    0xaec
The output of the info reg command is shown above. We can see that the X register is pointing to 0x56C in memory (remember the X register encompasses the value of r27 and r26). This means that the ‘@’ character of the flag is at index 0x576 – 0x56C = 0xA (decimal 10). We can now write a brute force method for the key in Python by transcribing the decryption algorithm I outlined above.
cipher_text_byte = 0xed
test_index = 10

for key in range(256):
        if (((cipher_text_byte ^ key) + test_index) & 0xff) == ord('@'):
                print "KEY IS 0x%x" % (key)
                break
Running this code reveals the key byte to be 0xDB. Now, we can run the program again in simavr, set a breakpoint at the beginning of the decryption loop, set $r24 to 0xDB, run the decryption and break at the comparison of the 10th character to ‘@.’ Here, we should be able to print the flag string at 0x56C to reveal the decrypted flag in memory. This quick and dirty set of GDB commands should do the trick – you can save this to a text file and run avr-gdb -x cmds.txt to run it as a script.
# Connect to our debugging session
target remote :1234
# Break at main decryption loop
br *$pc + 0xaec
# Continue
c
# Set r24 to be the key value we calculated
set $r24=0xdb
# Disable the breakpoint so we leave the decryption loop
dis 1
# Break after the decryption loop
br *$pc + 0x12
# Continue
c
# Print the flag
x/s 0x56c
Running this script yields the following:
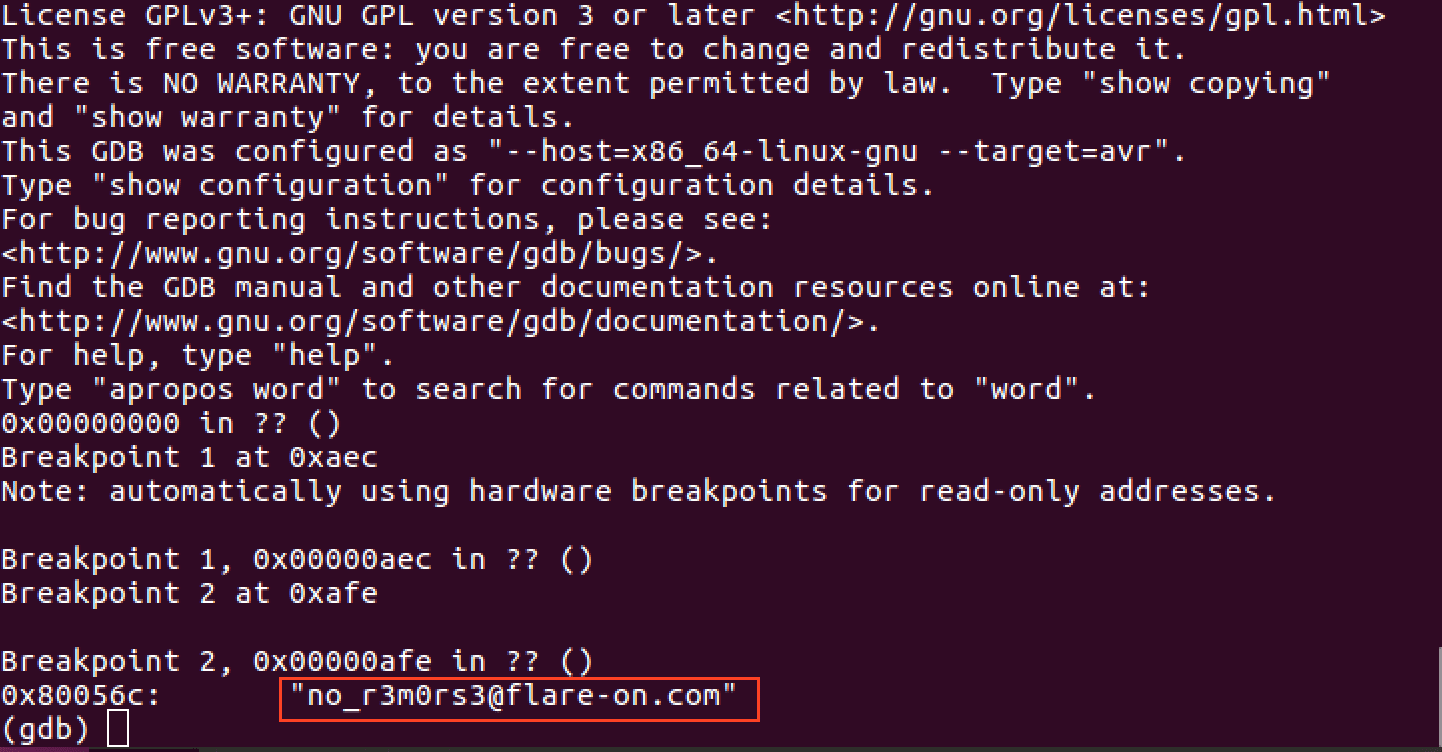
The flag, “[email protected]” is printed. Alternatively, we could’ve used Python to generalize the decrypt script to the entire array, but where’s the fun in that?
Conclusion
In this blog post, I shared two very different tools with two very different applications. Acquiring and learning new tools and skills is important for every reverse engineer – from the fledgling to the veteran. I hope that I was able to convey my mindset, motivation and method of using these tools, and was able to provide inspiration for you, the reader, to maybe give them a try for yourself. Happy reversing!
Relevant Links
FLARE-On 2017 Challenges (password: “flare”) – http://flare-on.com/files/Flare-On4_Challenges.zip
PHPStorm – https://www.jetbrains.com/phpstorm/
XDebug – https://www.xdebug.org/
simavr GitHub Page – https://www.github.com/buserror/simavr


