In the previous article we enabled JTAG access for the Beaglebone Black. The next step in the working with the low level Beaglebone hardware is to get a baremetal firmware running on it. This will remove the complexity of the Linux kernel and allow us as Reverse Engineers to focus on the hardware itself.
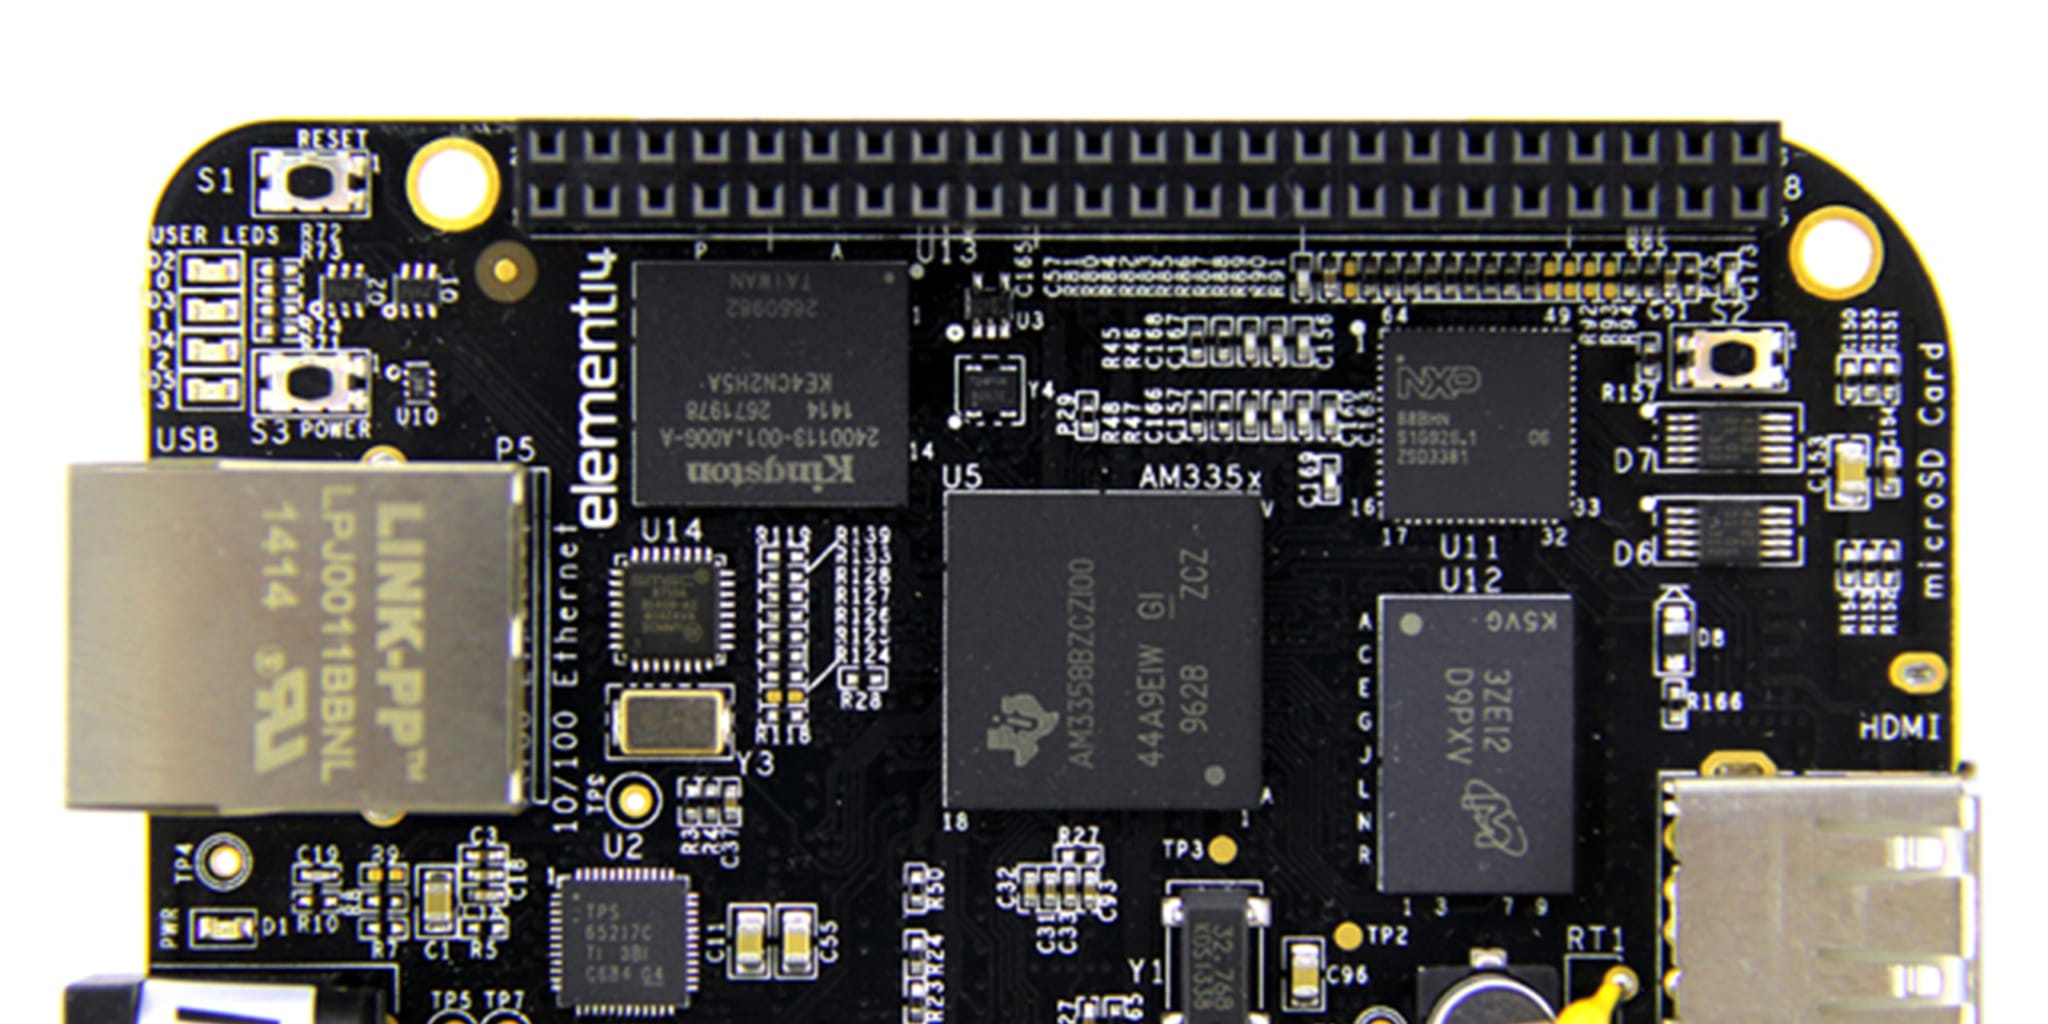
The BeagleBone Black is a low-cost embedded board that boasts an ARM AM335x SoC. It has community support for Linux, Android, Ubuntu and Ångström already available. It comes pre-loaded with the MLO and U-Boot images on its eMMC which can be flashed with custom binaries. Bootup can be done from a partitioned SD Card or by transferring binaries over UART (ymodem), Ethernet, or USB. For this post we will be using the SDCARD boot as well as the TFTP boot over Ethernet.
Required Materials
- Beaglebone Black or Beaglebone Industrial
- TI Starterware 02.xx.01.01
- Cross-compiler build enviornment for ARM AM335x SoC
- TFTP server accessible via your Beaglebone Black
- SD Card loaded with the latest Jessie image
Getting Started
The first step is to get a cross-compiling build environment up and running. In our case, we are going to use an Ubuntu 16.04 desktop base install (Virtual Machine). The StarterWare project contains both a Code Composer Studio configuration as well as GCC configuration. For the purposes of this post we will be using the GCC toolchain in order to build the example projects.
Getting going is pretty quick in Ubuntu. Simply install the gcc-arm packages by:
sudo apt-get install gcc-arm-none-eabi build-essential
After this, you should be able to find the arm-none-eabi- programs:
jkarrels@jkarrels-VirtualBox:~/$ which arm-none-eabi-gcc
/usr/bin/arm-none-eabi-gcc

jkarrels@jkarrels-VirtualBox:~/$ arm-none-eabi-gcc --version
arm-none-eabi-gcc (15:4.9.3+svn231177-1) 4.9.3 20150529 (prerelease)
Copyright (C) 2014 Free Software Foundation, Inc.
This is free software; see the source for copying conditions.  There is NO
warranty; not even for MERCHANTABILITY or FITNESS FOR A PARTICULAR PURPOSE.
Now you have both the enviornment and the code to continue on.
TI Starterware
The Texas Instruments StarterWare wiki can be found here. StarterWare is a free software development package that provides no-OS platform support for ARM and DSP TI processors. StarterWare includes Device Abstraction Layer (DAL) libraries and example applications that demonstrate the capabilities of the peripherals on the TI processors. StarterWare also provides pre-built binaries for quick evaluation on the target.
Getting the code
The StarterWare wiki has various versions of StarterWare available for download. We will utilize the bleeding edge software. Versions earlier than the one we use here will need to have the BeagleBone patch applied to them. Clone the StarterWare repository at the following location:
git clone git://git.code.sf.net/p/starterwarefree/code starterwarefree-code
Configuring
The StarterWare needs to be configured for your build enviornment. The main configuration is the library paths. Start by setting your LIB_PATH to the /usr directory which is where APT put the relevant files.
export LIB_PATH=/usr
When that is complete, you need to set the makefile variables to account for the library paths. Edit the following file:
vim ${TI_HOME}/starterwarefree-code/build/armv7a/gcc/makedefs
In the beginning of this file the LIB_GCC and LIB_C paths need to be set to the appropriate locations. If you do not know where these are, just search your filesystem for the libgcc.a and libc.a files.
LIB_GCC=${LIB_PATH}/lib/gcc/arm-none-eabi/4.9.3/
LIB_C=${LIB_PATH}/lib/arm-none-eabi/lib/
Compiling
At this point you should be able to go into one of the example projects and build. If you get linking errors, go back and verify your paths as it is pretty easy to forget to set a variable.
cd ${TI_HOME}/starterwarefree-code/build/armv7a/gcc/am335x/beaglebone/rtc
make
When you are done with this, go ahead and put the freshly compiled binary onto the TFTP server
cp ${TI_HOME}/starterwarefree-code/binary/armv7a/gcc/am335x/beaglebone/rtc/Debug/rtcClock.bin /tftpboot/download.bin
TFTP booting
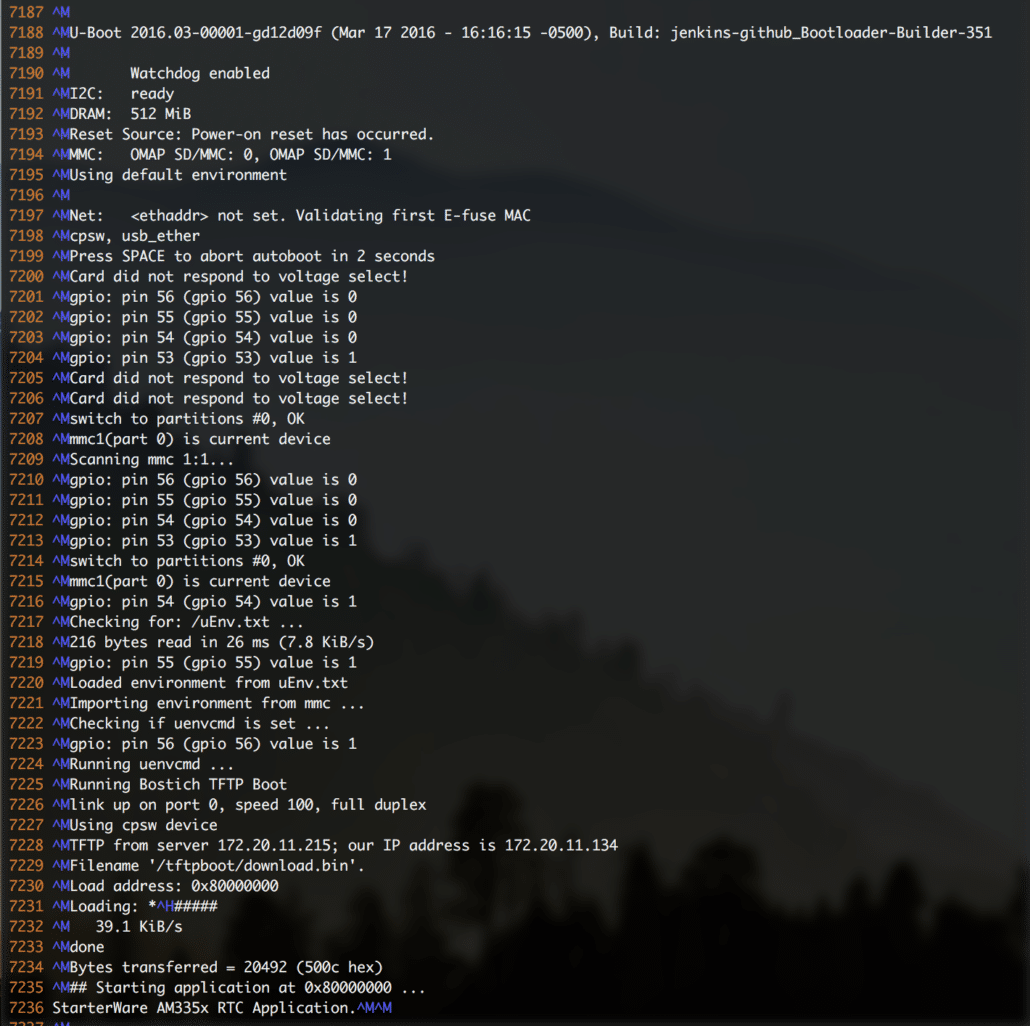
At power-up an OMAP3 device begins booting from internal Boot ROM. This code is fixed during the manufacturing process and cannot be altered. The Boot ROM reads boot configuration pins (SW4 on the OMAP3 EVM) which tell the Boot ROM where to look for the first external bootloader. The choices include NAND, UART, and SD/MMC Card. Control is then passed to this first external bootloader called x-loader. The x-loader application is included in the Linux PSP provided by TI and can be modified by the end user. The x-loader application passes control to u-boot. U-boot is also a bootloader and is considered the second external bootloader in this case. U-boot is the application which passes control to the application of choice. The main goal of u-boot is to retrieve the firmware and provide the kernel with information about the location of the Linux filesystem. U-boot can be configured to retrieve the kernel from NAND, SD/MMC Card, UART or Ethernet (via TFTP). U-boot can also specify a root filesystem that is located in NAND (jffs2), SRAM (ramdisk), SD/MMC card (ext3 partition) or mounted over IP (NFS). We typically choose to boot via TFTP when we are working on baremetal instrumentation. This process is fairly straight forward.
With a fresh Jessie install on a Beaglebone Black boot up into the linux console and add a file in the root of the file system named uEnv.txt. Make sure you put this into the root (/uEnv.txt). Be sure to re-read the last sentence, /uEnv.txt is where you override the uEnvCmd – the uEnv.txt file that is in the /boot directory is used for secondary variable setup. In that file configure your TFTP specifics:
autoload=no
loadaddr=0x80000000
serverip=172.20.11.215
tftproot=/tftpboot
bootfile=${tftproot}/download.bin
tftpboot=tftp ${loadaddr} ${bootfile};go ${loadaddr}
uenvcmd=echo "Running TFTP Boot"; dhcp; run tftpboot
With that file in place, ensure you have an ethernet cable plugged in, the TFTP server running (with /tftboot/download.bin in place), and go ahead and reboot the Beaglebone.
Gotcha
I am fairly annoyed when people do this in blog posts, but I am going to do it anyways as I am sure someone else will benefit from this dialog. I hit a bit of a problem. When I rebooted the board I expected my “rtc” firmware to load and give a prompt. Instead, I got this:
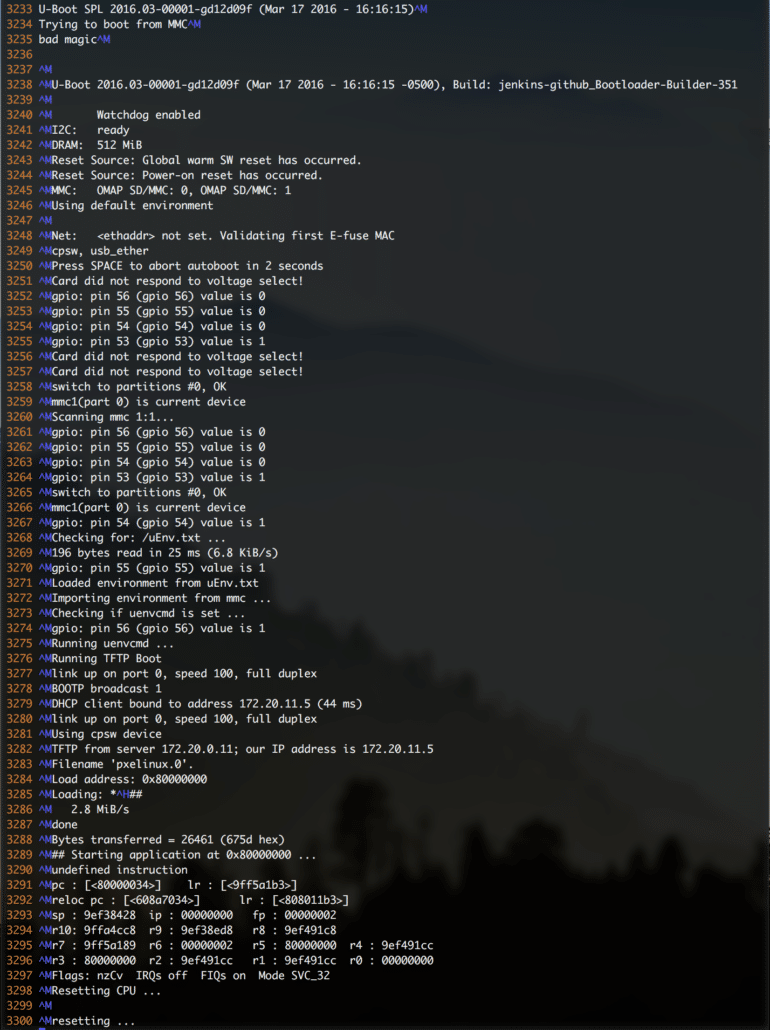
I will admit to having spent far too much time re-compiling the firmware and attempting to get it to load. It worked when I loaded it over JTAG, which was pretty curious. Finally I took a step back and manually booted the firmware via the uboot console and everything loaded up as expected. So it is not the firmware, it is not the TFTP process, interesting… I went back over the screen log and if you look closely you will see on line 3283 an attempt to boot from pxelinux.0! I completely forgot my network had an Ubuntu net installer on it. I was assuming that the dhcp command injected into the uenvcmd field of the uEnv.txt would be fine because when I tested it on the commandline it works as expected. i.e. when one sets autoload=no and then issues a dhcp command from the command prompt, uboot will obtain a dhcp lease and stop there. It will not continue on the boot process if it gets a bootp response. When you put this in the uEnv.txt file, the “autoload=no” seems to have no effect and uboot boots the image via the network dhcp configuration. In short, at this point I have successfully made a beaglebone loop a reset loop, that is not very helpful. Going back to a fresh SD card I booted the device off of the MMC card so I could clean up the uEnv.txt that was on the flash. After booting I mounted the flash filesystem to clean up the uEnv.txt file:
sudo -i
mkdir flashedFilesystem
mount /dev/mmcblk1p1 flashedFilesystem
vim flashedFilesystem/uEnv.txt
For the easy way around the roadblock, I modified the /uEnv.txt parameters to include a static IP address for uBoot. I messed with autoload settings, post DHCP variable re-writes, and prayer for a little while. In the end, I just went with the static IP.
autoload=no
serverip=172.20.11.215
ipaddr=172.20.11.134
netmask=255.255.0.0
loadaddr=0x80000000
tftpboot=tftp ${loadaddr} /tftpboot/download.bin; go ${loadaddr}
uenvcmd=echo "Running TFTP Boot"; run tftpboot
That did it. From the following dump you can see the successful boot of the StarterWare application booting via TFTP.