Machine learning has become an integral part of many of the cloud services we use on a daily basis such as Google Assist and Apple Siri. The implementation of the neural networks comprising the back end of these services has taken the form of high performance computing (HPC) nodes using GPU hardware accelerators. Emerging applications such as autonomous cars and drones implement a mixture of machine learning and computer vision that require a high-throughput, low-latency platform while at the same time maintaining strict size, weight and power (SWAP) restrictions. These applications in particular are perfectly suited for FPGA hardware accelerators. Updated for Vivado/Petalinux 2017.4
GPUs vs FPGAs
So why go through all the trouble to target an FPGA over a GPU? Below is a typical vehicle sensor processing system using a traditional CPU-GPU SoC, such as an Nvidia Tegra, and a Zynq FPGA SoC developed with the reVISION toolchain from Xilinx.
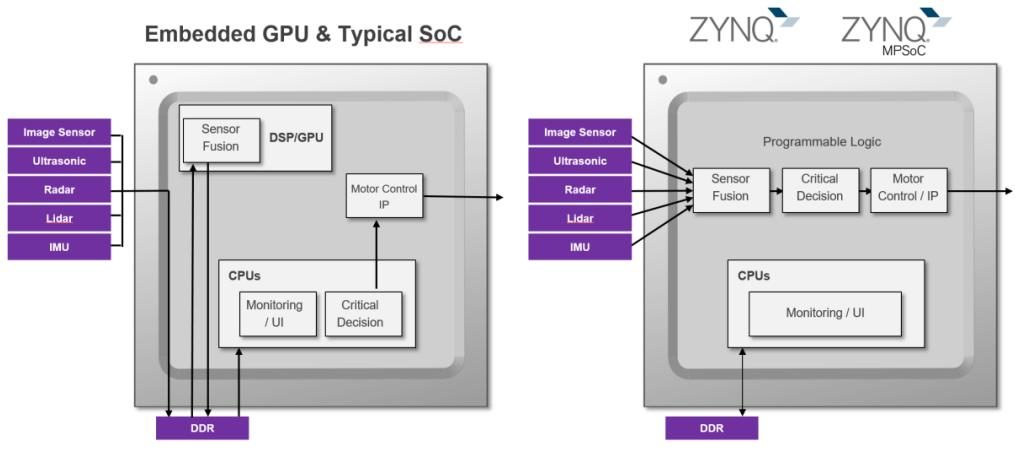
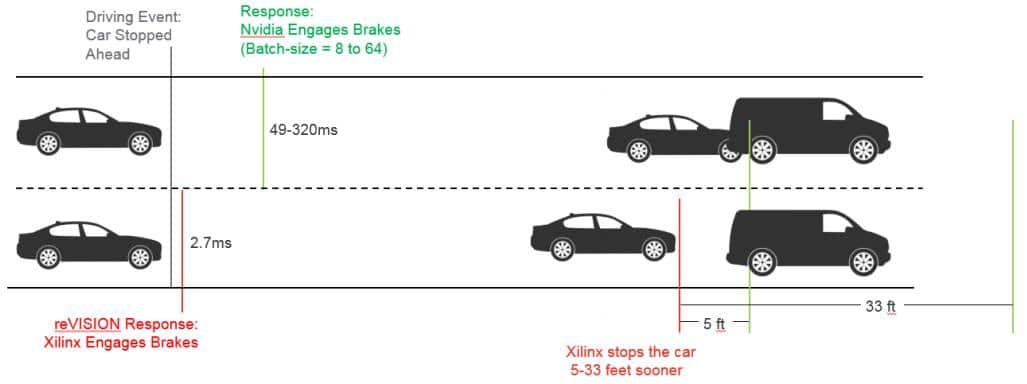
Latency
Take for example the vehicle’s automatic breaking system. The induced latency from transferring data between the sensor processing in the GPU to the critical decision making in the CPU can result in a significant delay in applying the brakes. By removing the CPU from the datapath and embedding the sensor processing, critical decision making and output control in the FPGA fabric you can achieve significantly better, and deterministic, results.
Performance Per Watt
Not only can you achieve significantly lower latencies but in many applications the performance per watt is far better as well.

It’s all about the Floating Point
The issue, at least for now, when it comes to GPU vs FPGA neural network performance is all about floating point operations. FPGAs use embedded DSP blocks to compute floating point operations; and today even the biggest, fastest FPGAs can’t compete with GPUs in that respect. However, according to recent research such as FINN: A Framework for Fast, Scalable Binarized Neural Network Inference “convolutional neural networks contain significant redundancy, and high classification accuracy can be obtained even when weights and activations are reduced from floating point to binary values”. This is great news for FPGAs especially when the training data for Binary Neural Networks (BNN) can fit into on-chip-memory, further reducing latencies and increasing performance per watt.
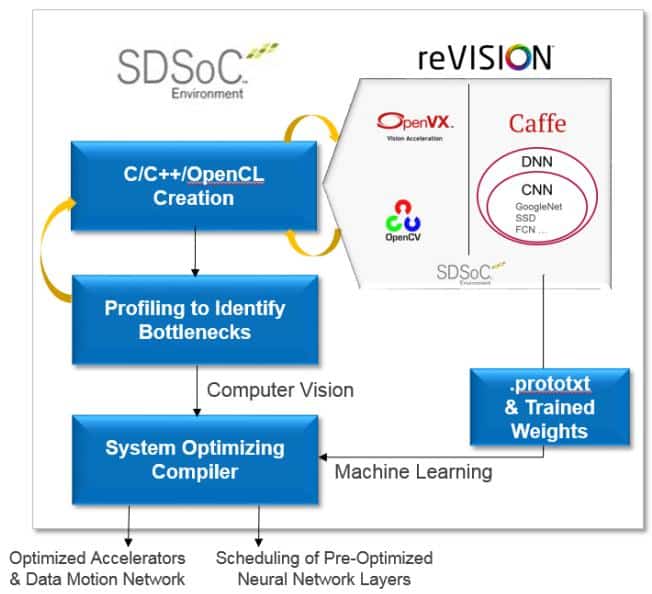
The Toolchain
Now the bad news. The toolchain for creating FPGA logic from high-level languages such as OpenCV, OpenVX and Caffe are in their infancy. Currently Xilinx provides the reVISION toolchain and the SDSoC high-level compilers to translate these applications into Hardware Description Language (HDL). This process typically starts with cross-compiling your application onto the ARM CPUs in the FPGA SoC.
That’s why we’re here: To develop our application on the FPGA SoC, and use the FPGA as an accelerator, we need a well supported Linux development environment such as Ubuntu.
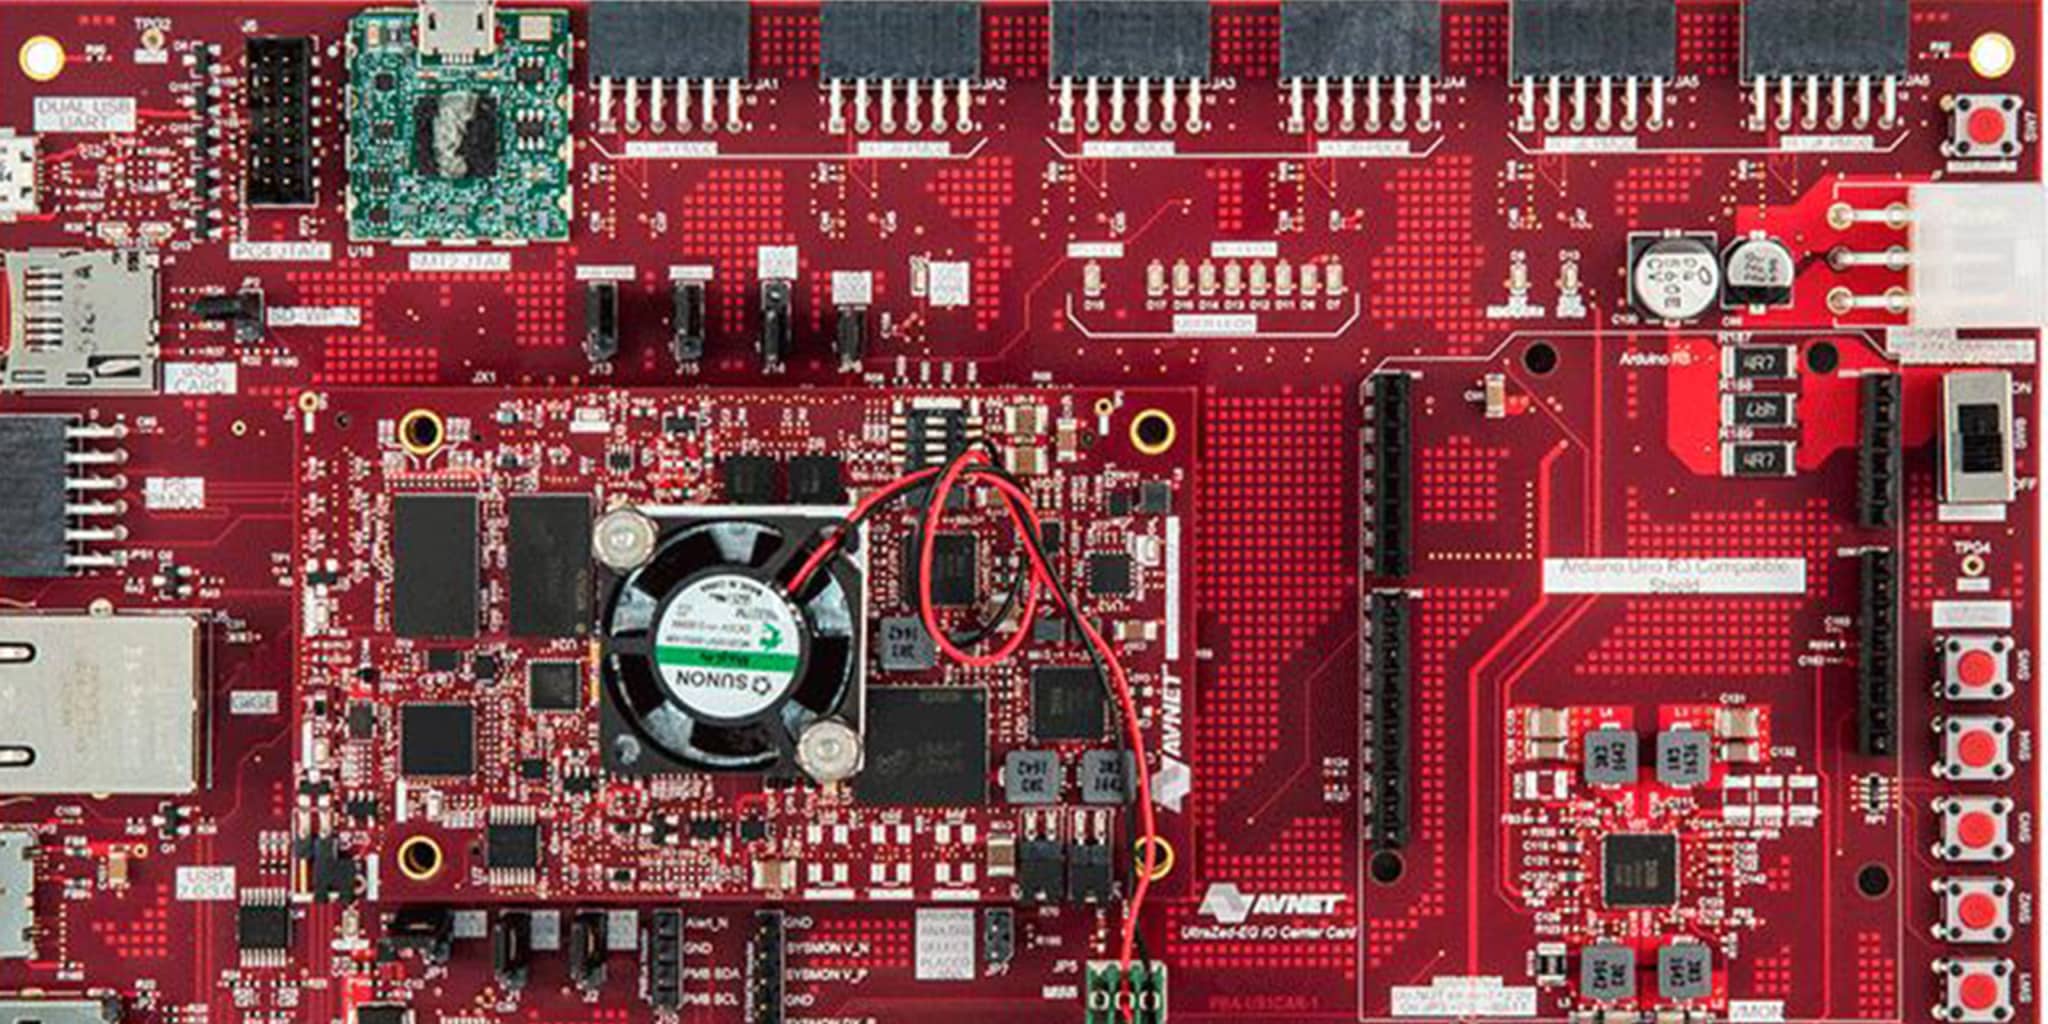
Meet the UltraZed
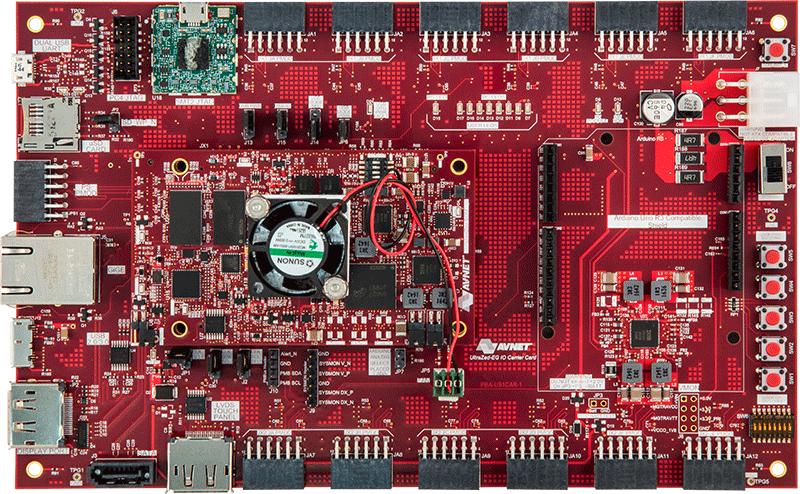
The suite of Zedboards have been at the forefront of the Xilinx Zynq development community since the the original Zynq release, and the latest UltraZed board follows the same sytstem-on-module (SOM) design as the MicroZed and PicoZed before it. The UltraZed, however, moves from the Zynq 7000 SoC to the new Zynq Ultrascale+ MPSoC, specifically the XCZU3EG-SFVA625.
The UltraZed Starter Kit includes the UltraZed SOM and I/O breakout board which provides access to high speed peripherals, JTAG, USB-UART’s and plenty of I/O including an Arduino Shield and several Digilent PMOD connectors. Also available is the UltraZed PCIe Carrier Card which provides a high-speed FMC connector as well as a PCIe edge connector for high-performance hardware acceleration applications.
Zynq Ultrascale+ MPSoC (ZynqMP)
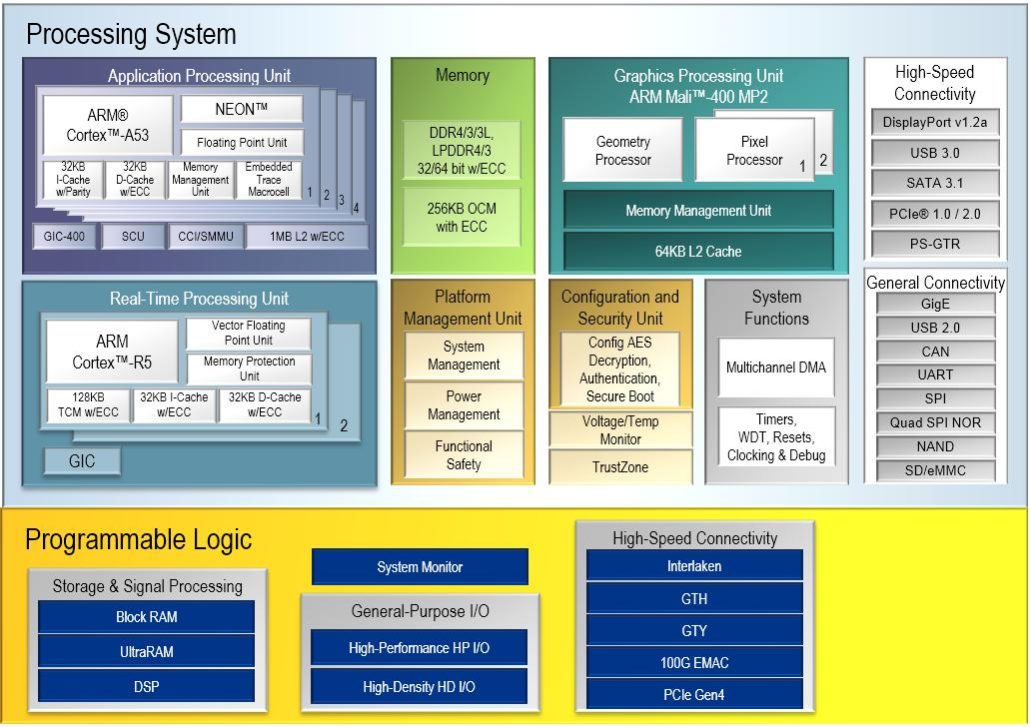
The ZynqMP Technical Reference Manual provides detail about the ZynqMP architecture featuring a quad-core Cortex-A53 Application Processing Unit (APU) and a dual-core Cortex-R5 Real-Time Processing Unit (RPU) as well as an ARM Mali-400 GPU. The addition of the Platform Management Unit (PMU) and Configuration Security Unit (CSU) provides a hardware-backed, triple-redundant, real-time system monitoring capability and a much higher level of reliability and security.
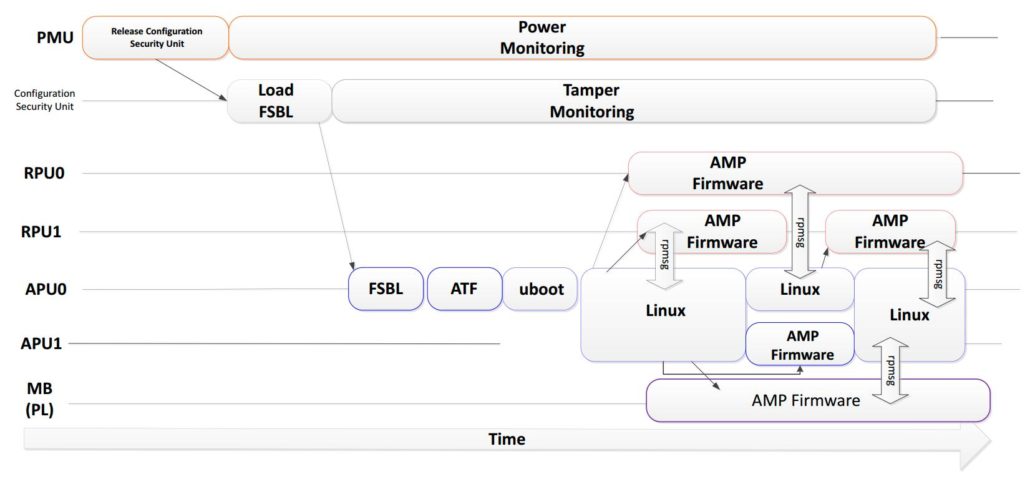
ZynqMP Boot Flow
The ZynqMP Software Development Guide provides detail about both secure and non-secure boot flows (we’ll be using the non-secure boot flow). The CSU is a 32-bit triple redundant processor that runs out of boot ROM. The system can access its resources such as the AES, SHA and RSA hardware accelerators as well as key management blocks but we don’t need to build any firmware for the CSU.
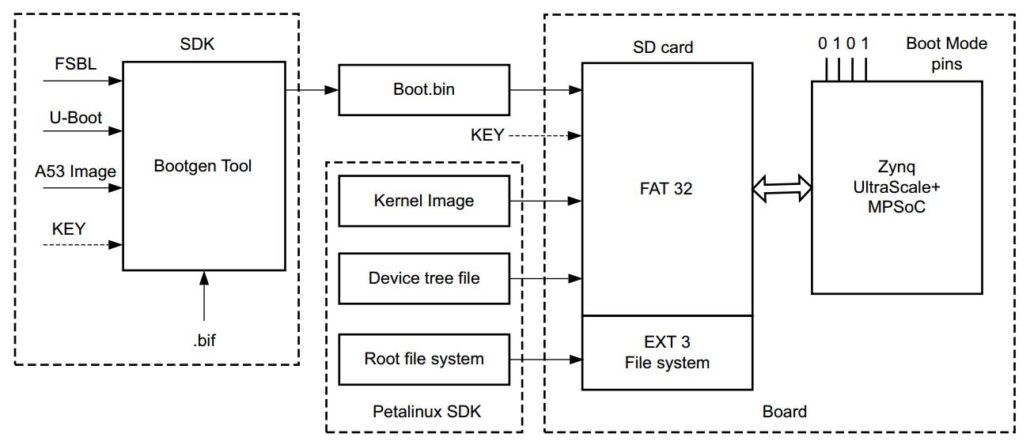
ZynqMP SD Card Boot
The ZynqMP Software Development Guide provides detail about booting from various sources. We’re going to boot from the SD Card, so we need to generate a boot image, Linux device tree and kernel for the first FAT32 partition and the Ubuntu root file system for the second EXT4 partition.
Let’s Install Ubuntu
The following guide was developed running native 64-bit Ubuntu 16.04.3 Desktop Linux with Vivado 2017.4 and Petalinux 2017.4. Xilinx officially supports CentOS 7.1, RHEL 6.6/6.7/7.1/7.2, SUSE 12.0 and Ubuntu 16.04.
Currently the UltraZed Starter Kit ships with production silicon so the free Vivado Webpack will work. I’ve also verified that the ES1 silicon that shipped previously will successfully configure with an image build for the production device.
Install the Tools
You’ll need to download and install the Vivado Webpack + SDK as well as the Petalinux tool suite from Xilinx.
- Download and install Vivado Webpack – Using the default install options works. DocNav is not required.
- Download and install Petalinux.
- Install Git LFS – Git Large File Storage is used to clone the pre-configured Ubuntu Server root file system image.
UltraZed Development Github Repository
This repository is intended to serve as a build framework for your custom system. You can add as many FPGA projects as you like and simply edit the env_setup.sh script to point to them. Out of the box the repository will build an Ubuntu Server Linux BSP and a simple FPGA design with a block RAM and simple register interface that can be used as an example of how to get started.
To setup your environment (including installing build dependencies for Ubuntu 16.04.3) run the following command:
git clone https://github.com/twosixlabs/ultrazed_dev.git
cd ultrazed_dev/
source scripts/env_setup.sh --install --vivado INSTALL_PATH --petalinux INSTALL_PATH
Build the FPGA + Linux BSP:
To build everything you can simply run the top level Makefile. This will build the FPGA image, Linux kernel, uBoot, and FSBL, PMU firmware and ARM Trusted Firmware used in the boot image.
cd ultrazed_dev
make all
Write the SD Card Boot and Root File System Partitions
Now that we’ve build the FPGA and Linux BSP we’re ready to put together the boot and root file system partitions of the SD card. The boot partition will contain the FPGA image, boot image, kernel image and device tree binary. The boot image is a binary generated with the Xilinx bootgen tool consisting of the FSBL, uBoot, ATF and PMU firmware.
The root file system partition will contain the pre-configured Ubuntu Sever 16.04.3 Linux distribution. I’ve pre-installed tools such as python3, numpy and openSSH server.
cd ultrazed_dev
make install
Write the SD Card
Now we need to partition, format and write our boot and root file system partitions to an SD card. The provided shell scripts can perform all the necessary actions – Just ensure that the device is not mounted after insertion.
The script can also make a copy of the boot and root file system partitions in the /root directory of the root file system using the ‘–mmc’ option. This can be used later to install your new Ubuntu Server build to the UltraZed’s local eMMC storage.
The wr_sdcard.sh scirpt needs root privileges in order to mount/unmount, partition and format the SD card
./scripts/wr_sdcard.sh --part --dev DEVICE_NAME
sudo python3
import ultrazed
ultrazed.fpga_benchmark(100)
First Boot Configuration
Configure your UltraZed boot pins to boot from the SD card
The first time you boot the UltaZed it will source it’s uBoot environment from QSPI – This will be the default environment that ships with the board. To overwrite this break into uBoot by pressing any key and enter the following commands:
- To write the default environment we’ve just built: ‘env default -f -a’
- Set the default boot device to the SD card instead of eMMC: ‘env set sd_dev 1’
- Write the environment to QSPI: ‘env save’
- Reboot the board: ‘reset’
Boot Ubuntu and Test
The ultrazed.py python module was added to the root file system for testing the memory mapped PS-PL interfaces. Once booted, login with the zynqmp user account. Login: zynqmp Password: password
Test Ethernet connectivity:
- Ping google.com or a host on your local network.
- Run “sudo apt-get update” then “sudo apt-get upgrade” to update the Ubuntu installation.
Benchmark the PS-PL interface using numpy RD/WR to the block RAM:
sudo python3
import ultrazed
ultrazed.fpga_benchmark(100)
Test the FPGA LED GPIO:
sudo python3
import ultrazed
ultrazed.led_count()
ultrazed.led_wr(0)
Issues
- I still have not been able to get the Display Port interface to work – Even after using the provided Display Port application note.
- Petalinux will occasionally get the following error: “ERROR: No space left on device or exceeds fs.inotify.max_user_watches?”. Run “sudo sysctl -n -w fs.inotify.max_user_watches=32768” to resolve it source the ./scripts/petalinux.sh scripts and run ‘fix_petalinux’. Also, the Petalinx tools will occasionally fail to source ‘bitbake’. Restarting your terminal session will usually resolve this.
More Information
- Xilinx Wiki – Most of this guide was based on the information found here – A really helpful resource for Zynq and ZynqMP development.
- Xilinx Vivado – Great resource for learning how to use Vivado.
- Xilinx Petalinux – Official Xilinx Petalinux page.
- PetaLinux Tools Reference Guide – Provides documentation on installing and using the Petalinx tools.
- Petalinux Command Line Reference Guide – Provides documentation on using the various tools in the Petalinux suite.
- ZynqMP Software Development Guide – Boot process, security features and everything ZynqMP software.
- ZynqMP Technical Reference Manual – ZynqMP architecture details including block by block overview of the entire SoC and low level register maps.
- Ultrazed Starter Kit – Documentation and support for the UltraZed.
- Xilinx reVISION Backgrounder – Implementation details for reVISION.
- Xilinx reVISION Toolchain – Real-time machine learning and computer vision based on Zynq/ZynqMP SoC’s using FPGA fabric for hardware acceleration.
- SDSoC – Xilinx’s high-level compiler used to translate C/C++ and OpenCL to FPGA HDL.
- FINN: A Framework for Fast, Scalable Binarized Neural Network Inference – A paper sponsored by Xilinx Research Labs providing a methodology for reducing CNNs to BNNs for FPGA implementation.


Bridging the gap between the impossible and the practical with innovative technology solutions in cyber, data science, mobile, microelectronics and information operations and a full spectrum of products and capabilities to advance national security missions.