Bridging the gap between the impossible and the practical with innovative technology solutions in cyber, data science, mobile, microelectronics and information operations and a full spectrum of products and capabilities to advance national security missions.
Software installation instructions increasingly assume internet access. This assumption makes finding installation instructions for computers not connected to a network, including the internet, difficult. Installing Docker on a computer without internet, known as an air-gapped computer, can make transferring software much easier. This post goes over the steps to installing GPU-enabled Docker on an air-gapped Ubuntu computer, though other Linux systems are likely similar. The post will mark the GPU specific directions for those who only want to install docker. My main sources for this post were https://docs.docker.com/engine/install/ubuntu/ and https://github.com/NVIDIA/nvidia-docker/issues/1134.
In addition to the air-gapped computer, you will need a computer with internet access (optionally with docker installed for testing) and a way to transfer data between the two machines like a writable DVD.
Step 1. Collect OS and hardware information on the air-gapped computer
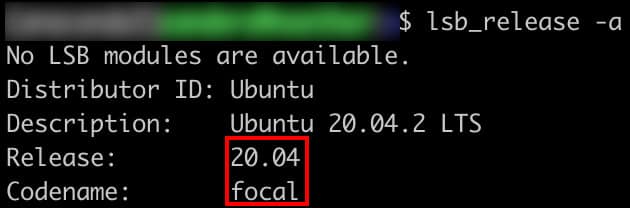
On your air-gapped machine type in lsb_release -a and note the release and the codename.
Then type in uname -m and note the architecture of the machine.

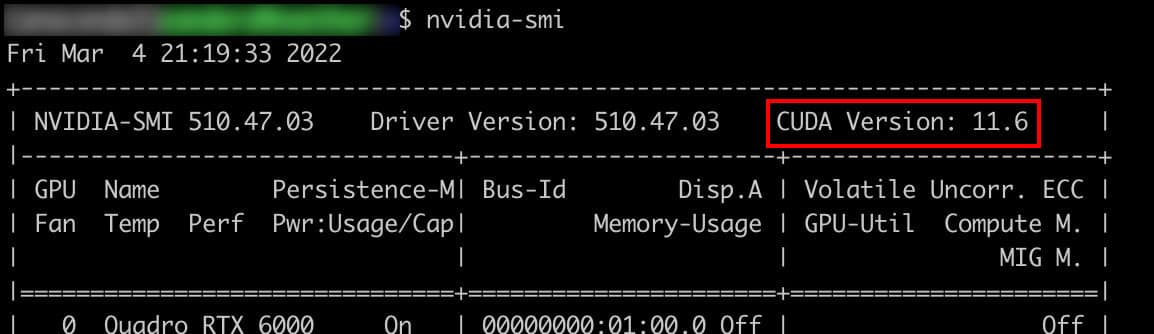
(GPU) This post assumes that the NVIDIA drivers are already installed on the air-gapped machine. To check this type in nvidia-smi and you should get output similar to below. (Optional) For testing the GPU-enabled Docker collect the CUDA version.
Step 2. Get the deb files for Docker
On a computer with internet, go to https://download.docker.com/linux/ubuntu/dists/
Click on the codename of the air-gapped machine, then browse to pool/stable/. Then choose amd64, ppc64el, or s390x based on your architecture. In our case, x86_64 means we need amd64. Download the containerd.io, docker-ce_cli and docker_ce files you would like, for example, containerd.io_1.4.9-1_amd64.deb, docker-ce-cli_20.10.9~3-0~ubuntu-focal_amd64.deb, and docker-ce_20.10.9~3-0~ubuntu-focal_amd64.deb.
(GPU) Step 3. Get the deb files for NVIDIA container toolkit
Go to https://github.com/NVIDIA/libnvidia-container/tree/gh-pages/stable/, click your Ubuntu release, amd64 or ppc64el based on the architecture. Then you download the libnvidia-container1, libnvidia-container-tools, nvidia-container-toolkit, nvidia-container-runtime and nvidia-docker2 deb files, for example libnvidia-container-tools_1.8.1-1_amd64.deb, libnvidia-container1_1.8.1-1_amd64.deb, nvidia-container-runtime_3.8.1-1_all.deb, nvidia-container-toolkit_1.8.1-1_amd64.deb, and nvidia-docker2_2.9.1-1_all.deb.
(Optional) Step 4. Download Docker images to test Docker
On a computer with internet and docker perform docker pull hello-world:latest then docker save hello-world:latest | gzip > hello.tar.gz to save the docker image to test docker.

(GPU) To get the Docker images to test Docker with GPU perform docker pull nvidia/cuda:-base-ubuntu (for example docker pull nvidia/cuda:11.6.0-base-ubuntu20.04) then save the docker image with docker save nvidia/cuda:-base-ubuntu | gzip > nvidia.tar.gz
Step 5. Transfer all the deb files and (optional) Docker images to the air-gapped computer
Put the files on the writable DVD, or other preferred means, and load them to the air-gapped computer.
Step 6. Install Docker
Move docker deb files into a directory and cd into that directory. Then call, replacing the files with your deb files, sudo dpkg -i containerd.io_1.4.9-1_amd64.deb docker-ce-cli_20.10.9~3-0~ubuntu-focal_amd64.deb docker-ce_20.10.9~3-0~ubuntu-focal_amd64.deb. That should install it.
(Optional) If you do not want to use sudo before docker commands you can add yourself to a docker group: sudo groupadd docker then sudo usermod -aG docker $USER and then you may need to restart the shell session. Otherwise, you will need sudo before docker commands.
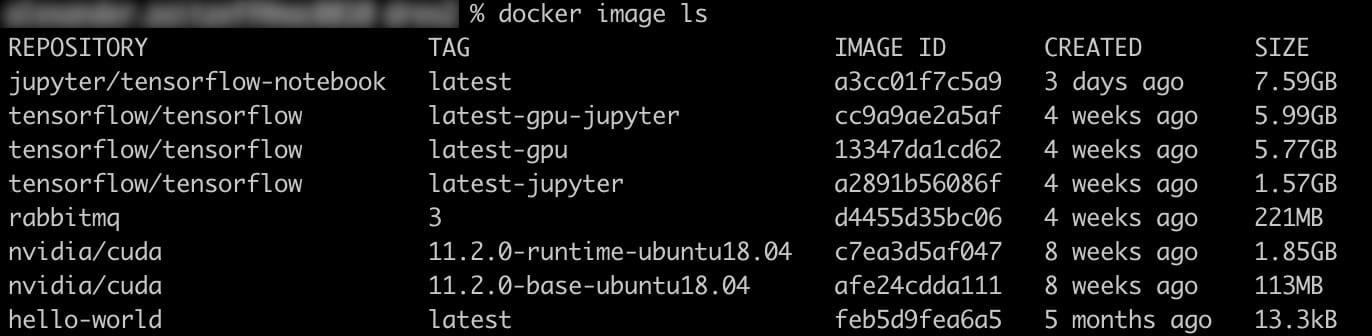
(Optional) To test if docker is working, load the hello-world image with docker load < hello.tar.gz. You can see your Docker images with docker image ls.
Run docker run hello-world, if docker is installed correctly you should get:

(GPU) Step 7. Install NVIDIA Container Toolkit
Move the NVIDIA deb files into a directory and cd into the directory. Then call sudo dpkg -i libnvidia-container1_1.8.1-1_amd64.deb libnvidia-container-tools_1.8.1-1_amd64.deb then sudo dpkg -i nvidia-container-toolkit_1.8.1-1_amd64.deb nvidia-container-runtime_3.8.1-1_all.deb nvidia-docker2_2.9.1-1_all.deb. You may need to restart docker with sudo systemctl restart docker for Docker to find the toolkit.
(Optional) To test that GPU is enabled load the NVIDIA CUDA image with docker load < nvidia.tar.gz. Then call docker run --gpus all --rm nvidia/cuda:-base-ubuntu nvidia-smi and you should get the same output as calling nvidia-smi outside of docker: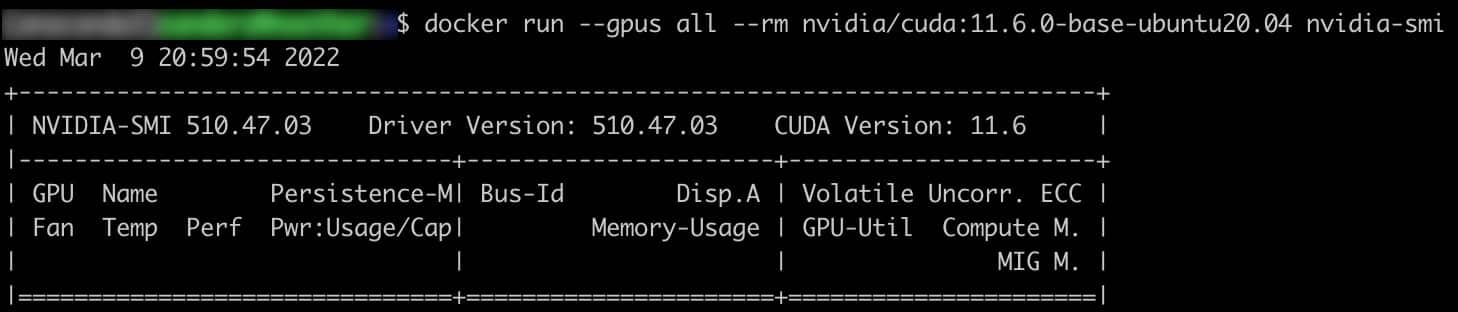
You have done it! Now you can use GPU-enabled software on your docker containers. For example, you can download the TensorFlow GPU docker image, save it, transfer it to the air-gapped computer, and can use TensorFlow on your GPU easily.
About the author
Alexander Zaitzeff is a senior research engineer at Two Six Technologies. His projects include machine learning for synthetic protein design and image reconstruction from mouse neural data.